Showing posts with label Gadgets. Show all posts

Thursday, April 30, 2009

Eye-Fi Explore Video 4GB Wi-Fi Memory Card Review

About 2 years ago a small company innovated with something as simple as a camera storage card by sticking wireless connectivity in it and giving the ability to wirelessly transmit photos from a basic digital camera to a computer and online photo  site wirelessly.  Eye-Fi over time, also added the ability to wirelessly upload video, geotag the photos with the location taken and added many new online sharing sites.  I've just received their latest version of the Eye-Fi with many additional features I thought were missing from their earlier product.

P1020199P1020196P1020195

The basic premise behind the Eye-Fi is a solid one.  Take most digital cameras, plug in the Eye-Fi SD or SDHC memory card and you can wirelessly transmit photos to your computer and to your favorite online photo/video sharing site and even automatically geotag that photo with the location the photo was taken.  Yes you can do all of this manually with many additional steps, but not this easily.  The original Eye-Fi was a simple, but smart creation.  This new video-aware version along with Eye-Fi's other improvements make the card even better for those that need the process to be crazy-easy or even those that are just don't want to mess with the additional steps required to do all of the above.  Better yet, if you want it to, it tags where you took the photo as well. 

Eye-Fi Specifications:

Wi-Fi Security: Static WEP 64/128, WPA-PSK, WPA2-PSK
Note: Shared WEP and Apple’s version of WEP TSN are not supported.

  • Typical Range: 90 feet outdoors and 45 feet indoors
  • Storage Capacity: 2.0GB and 4.0GB (1GB is defined as 10^9 Bytes)
  • Power: advanced power management optimizes use of camera battery
  • Card Dimensions: SD & SDHC standard 32mm x 24mm x 2.1mm
  • Wayport (Now AT&T) Hotspot for uploads and/or geotagging


Review Hardware

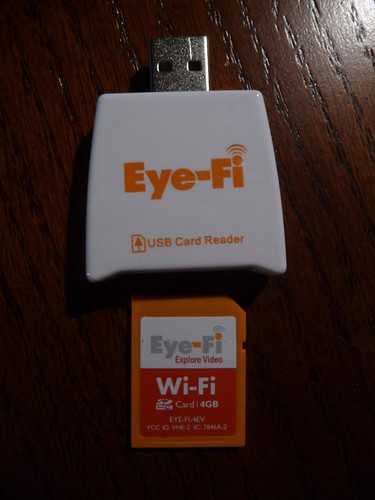
I received this latest version of the Eye-Fi card thanks to Dave Zatz of ZatzNotFunny! who had reviewed the earlier version of the Eye-Fi card last year.  This review card is the highest-end version called the "Eye-Fi Explore Video" that runs $99.99 retail.  The card has one year of public wi-fi hotspots (formerly WayPort, but now owned by AT&T) access, geotagging, 4GB SDHC storage and video upload capability.  The review was done using my Panasonic DMC-TZ5 camera that has SDHC and video capability.

Problems

My previous experience with the Eye-Fi card has been good.  My parents purchased the 2GB version of the Eye-Fi and got it working to wirelessly upload their photos to their computer and flickr without any problem.  So when I received my first review card for this new version I expected everything to be flawless.  Unfortunately, I had hours of trouble.  After some time with Eye-Fi customer support it was determined that the card was a dud.  While the process was admittedly frustrating, customer support offered to send a replacement card free of charge even before they realized I was reviewing the card.  Good customer service was had and while disappointing to get a bad card initially, Eye-Fi took care of the problem

Setup

Setup was as easy as it could be.

I plugged the card into the provided reader (actually you can use the reader or your own SD card reader) and the card was detected immediately on Windows or Mac computers.

Eye-Fi Detected 1

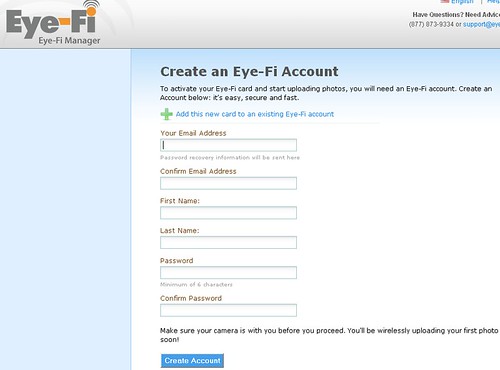
Installing the software and proceeding through the registration process (this "attaches" that card with your account) is done via web page to set up your Eye-Fi account.

Eye-Fi Create Acct 2


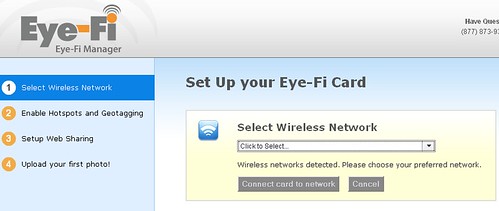
Once you've registered the card automatically searches for available wireless access points.  Select your WiFi access point and enter your "network password" (WEP 64/128, WPA-PSK, WPA2-PSK key).  The setup then runs through a few tests and then your card is connected to the wireless network - you can set up multiple Wireless networks if needed.

Eye-Fi Select Wireless 3


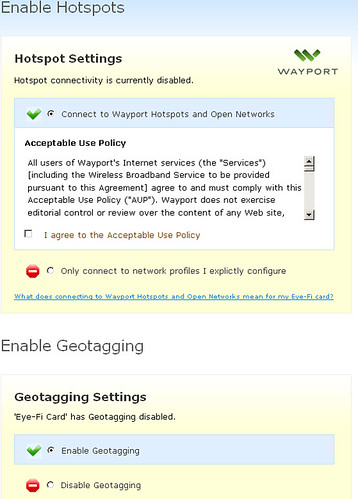
You then can optionally enable hotspot and geotagging.

Eye-Fi Select Wireless 5


You can configure to optionally upload photos to your computer along with options to add the date, use photo creation date or upload date etc.

ONLINE PHOTO/VIDEO SHARING SITES

  • Setup any online web photo/video sharing sites you want to upload to including:

    • Flickr
    • Picasa
    • Smugmug
    • Photobucket
    • WalMart
    • Webshots
    • Facebook
    • Shutterfly
    • Snapfish
    • TypePad
    • MobileMe
    • RitzPix
    • Dotphoto
    • Kodak Gallery
    • AdoramaPix
    • Costco
    • Evernote
    • Fotki
    • Gallery
    • Nikon My Picturetown
    • Phanfare
    • Px
    • Vox
    • Zenfolio


    Eye-Fi in action

    Once you've set the Eye-Fi card up on your computer, using it is easy.  Take your photos and videos anywhere and as soon as you're in range of your home Wi-Fi network or one of the public WayPort hotspots (only the ones that don't require signons) it will upload the photos automatically to the places you designated during setup.  I set mine to upload to my personal HTPC computer (so I can instantly view the photos on my HTPC and laptop digital photo frame) and to upload to my flickr and YouTube account.  Depending on the file size (high quality photos and all videos can take a bit of time), the photos upload automatically - in my case less then one or two minutes for a bunch of photos or a even one or two short video clips.

    If you turn off your camera or go out of the WiFi range before it has uploaded all of the photos, it will continue where you left off next time your camera is on and in range.

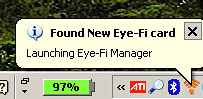
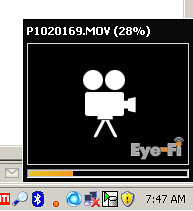
    On your computer, you'll see the following pop-up notification show up on your taskbar with a preview of the media being uploaded.

  •  

  • Eye-Fi Video Upload

    TRANSFER TIME:The longest it took to upload the highest quality JPEG photo my camera could handle was 15 seconds.  Videos took longer, but no longer then one minute per short video clip.

    E-mail and Text Message Notification

    One of the new features available that I really liked was the ability for notifications to e-mail and/or text message to let you know new uploads had been completed via Eye-Fi.  Below is a screen-shot of an e-mail I received after uploading a single video and photo:Eye-Fi e-mail notification

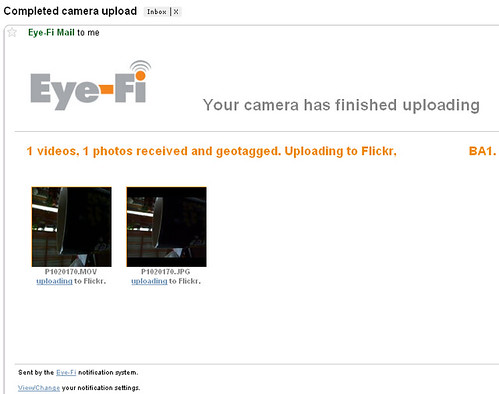
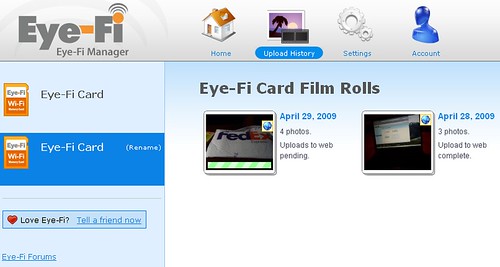
    You also can see your upload history and adjust settings using the Eye-Fi manager (website based) on the computer where you installed the software on.

  •  

    Eye-Fi Manager Upload History


    Public Wireless Hotspots and GeoTagging

    On the version I tested (Eye-Fi Explore Video) there is one free year of public, wireless hotspots access which gives you the ability to upload photos and videos.  I tried this out on four different wireless hotspots (WayPort now owned by AT&T) and of the four, one of them actually allowed me to upload photos.  This is because many of those hotspots require some sort of login - which your camera can't do.  So not quite as useful as it first seems.  When it works though it's quite useful - I had some photos I took at the Kansas City airport that uploaded to my computer at home and to flickr as soon as I snapped the photos.  And best yet, I could see previews of those photos on my phone moments later.

    Geotagging is another really nice feature.  If you enable the feature in the setup, any photos you take on the Eye-Fi card are tagged with the location they were taken at.  This is not an exact science as the location is determined based on the local Wi-Fi it can attach to.  I found that this worked throughout Kansas City where I took my pictures even when I couldn't upload a photo on one of those many public hotspots, the Eye-Fi was still able to grab the location to geotag the photos.  Obviously some will be slightly mis-tagged if there is no nearby Wi-Fi, but it will typically capture the city your in as soon as it can grab a nearby Wi-Fi location.


    One Moment of Concern

    Other than the initial bad card I received, everything worked nearly perfectly with the Eye-Fi.  I say nearly because there was about 10 minutes where I couldn't upload photos.  Why?  Because their website (probably server) was "under maintenance" in the middle of a Wednesday.

    Eye-Fi Website Down

    This exposes an issue with a service that requires a central server the way Eye-Fi does although you could always hack your Eye-Fi if you really needed to.  I don't see this being a big deal, but it definitely is a possible weakness in the service if something ever happened to the company.

     Negatives:

    • Wifi transfers aren't as fast as USB - so large numbers of photos and videos will take a longer time to transfer
    • JPEG Only - still no RAW format support
    • will geotag all photos and adds Wayport hotspot uploads (free the first year, $19/yr thereafter). While the geotagging feature is pretty cool, until/unless Starbucks hotposts (AT&T or T-Mobile) are added, I’d purchase the Share card… which I’m surprised they’re not offering (yet?) in 4GB capacities.
    • It's going to upload every single photo you take - even the bad ones.
    • Requires that the camera does not power off otherwise obviously transmission is interrupted
    • Will have an undetermined effect on camera battery life
    • Only available in SD or SDHC cards

    Positives:

    • Super easy to move photos and videos to your local computer and your favorite online websites - no cables, card readers or manual imports needed
    • Geotagging feature works amazingly well
    • 4GB capacity has arrived finally.  And is definitely required if you plan to record video with this card.
    • Automatic notifications of uploaded photos by e-mail and/or text message

    Conclusion:

    This new version of the card and the improvements made by Eye-Fi make the new Eye-Fi worth it.  They now offer four different versions of the Eye-Fi cards at different prices and features:

    • Eye-Fi Home $49.99 - Basically the original 2GB version that allows you the capability to upload Jpeg photos to your computer wirelessly.
    • Eye-Fi Share $59.99 2GB version with free uploads to online sharing sites
    • Eye-Fi Share Video $79.99 4GB version with free uploads to online sharing sites
    • Eye-Fi Explore Video $99.99 4GB version with all features including lifetime geotagging and 1 year of Wi-Fi hotspots ($14.99 per year after)

    While there are certainly cheaper (and faster) SD and SDHC memory cards available, the convenience and ease the Eye-Fi provides is something you should consider.  I think wireless is a technology we'll begin to see integrated into more and more photo and video cameras going forward, but for now, Eye-Fi is a great way to get the additional features at a low cost and easy-to-setup process.

    I recommend this to most casual photographers and probably the average blogger as well.  I convinced my parents to buy one of the older versions of Eye-Fi and still consider this new one a great option.  With my Panasonic TZ5 camera I was able to snap photos and videoclips and have them arrive on my computer, laptop digital photo frame, flickr and YouTube without even thinking about it.  The slightly higher cost for the Eye-Fi card is definitely worth it for me and I think worth it for a good number of casual photographers as well. 

    Verdict: Recommended


  • Read more about Eye-Fi and purchase at the Eye-Fi website

  • NOTE:  There is also a new Eye-Fi iPhone app that I've just started to test - I'll post another article specifically about that soon.Eye-Fi on the iPhone

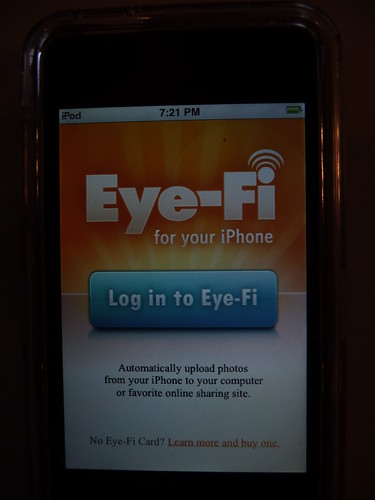
  • I'd like to thank the Eye-Fi team and especially Dave Zatz of ZatzNotFunny! for the opportunity to review the Eye-Fi Explore Card.

  • Tuesday, October 07, 2008

    Transform Your AppleTV with Boxee

    Have an AppleTV and don’t want to wait any longer for Apple to add new features?  Well your day has arrived because the team at Boxee has a nice Media Player User Interface that you can install on your AppleTV and transform the user interface and add new features.
    Boxee Menu
    Boxee is a project based on the xbmc (XBox Media Center) open-source project.  Boxee was developed to be a “social” media center program that plays media from your home network and the internet and also allows you to stream or download movies, tv shows, music and photos.  While Boxee is new to the AppleTV, it is also in alpha testing for Mac OSX 10.5 and Ubuntu with plans to release a Windows version soon.

    Boxee’s latest move has been to use a USB drive (Intel-based Mac & 512MB minimum flash drive required) to inject/patch the new UI into the AppleTV.

    The aim of the Boxee/AppleTV project is to “fill in those gaps” left by Apple for new feaures, video formats and non-Apple internet streaming.  Already AVI, Matroska (MKV), Ogg Vorbis and ISO images are all added file formats that aren’t supported natively by AppleTV.  Boxee adds the ability to stream from BBC, CNN, CNET, Revision3 and Last.fm with plans to add Hulu support by the end of this year.  Note that 1080p is currently not supported since Boxee doesn’t take advantage of the GPU.

    Boxee also adds a “friend system” that gives your friends a look at content they’ve played and the ability to recommend content to others.  You can also export recent playback history to friendfeed, tumblr & Twitter.

    After installing & you restart the the AppleTV, it will have two new menu items and the rest of the system is intact.  Below is a quick highlight of the installation and user interface:


    Read more about Boxee at their website

    Tuesday, April 29, 2008

    Reviewing the Firefly HTPC Remote Control

    When you purchase a Tivo or rent a Cable or Satellite DVR box the remote is part of the package -many times not even part of the decision.  But when you buy or build your own Home Theater PC (HTPC) choosing a remote control can mean the happiness or dissatisfaction with your powerful HTPC system.  The remote control is the unsung hero - many times a forgotten, but very important component of the HTPC setup.  Because of the great deal of versatility the HTPC brings the user, a HTPC remote control really needs to be a jack-of-all-trades remote.  A HTPC remote's job is very difficult since it controls TV, Movies, Music, Photos and more and ideally it should also control the television, receiver and any other AV equipment you use in your setup. 

    NOTE:  WIN THIS FIREFLY REMOTE CONTROL AT ZatzNotFunny! - GIVEAWAY RUNNING NOW

    Snapstream, the maker of Beyond TV has been selling one of the more popular HTPC remote controls, the Firefly remote control for several years now.

    DSC03888

    SnapStream provided Team Zatz Not Funny the remote control for review so I have my hands on Snapstream's Firefly PC Remote Control made just for the HTPC.  There are two versions of the Firefly, the original Firefly and the Firefly Mini.  Today, we'll focus on the original Firefly.  The Firefly is for sale at the Snapstream Store and retails for $49.95.  The Firefly remote is RF-based instead of most remotes that are infra-red.  This means it works without needing line-of-sight to work like infrared remotes do.  The advantage of RF is that it can work through walls, sofas, cabinets etc.  The disadvantage of RF is that most other devices such as TVs, DVD players etc are set up to work with IR remotes and don't work with the RF signals that the Firefly uses - but we'll get to that later in the review.

    I tested this remote using my Home Theater PC that has SageTV, Beyond TV and Beyond Media programs installed on it and have also tested it with Media Portal, Power DVD and VLC to name a few.  My primary test software was with BeyondTV though since that is the software made by the same company that makes this remote.


    REMOTE DIMENSIONS & APPEARANCE

    You'll find the Firefly fits nicely in your hand.  It measures just under 8" long, 2" wide and 1.4" thick.  It looks fairly sleek and is silver in color.  In person it has a toy-like look to me, but not so much it takes away from the appearance.  The Firefly is pretty light - just under 5 ounces with the two AA batteries (included with the remote.)  The batteries fit into a spot on the underside of the remote control.

    DSC03878 

    Dimensions (W x H x D):
    2.07" x 7.94" x 1.40"
    5.3cm x 20.2cm x 3.6cm

    Weight (With Batteries):
    4.7oz (132 grams)

    Weight (Without Batteries):
    3.9oz (108 grams)

    Buttons:
    48 total

    RF:
    433.92 Mhz

    Batteries:
    2 x AAA (included)


    The Firefly remote is shaped to fit the hand comfortably.  It's shaped narrow in the middle and expands towards the front and back of the remote.  It's colored with metallic silver with gray and white rubber buttons that protrudes upward more than most remote control buttons do.

    DSC03887DSC03885


    INCLUDED IN THE BOX:


    The firefly comes packaged with the following:

    • Firefly PC Remote
    • USB, RF receiver
    • CD (drivers and Beyond Media Basic)
    • Installation guide
    • User's guide
    • Two AAA batteries


    BUTTONS & BUTTON LAYOUT

    The first thing I noticed about the Firefly is there is no IR emitter on the top or front of the remote since it's RF-based.  There is an LED at the top of the remote that flashes when its transmitting to the receiver.

    The buttons are grey and shaped into squares that stick up from the remote more than most remotes buttons do.  The center button has the trademark Firefly logo and name on it which some will find nice, but I don't really care for all that much.  Many of the buttons are labeled above the buttons (not on the button) while others are labeled with black on white labels.  There is no backlighting so you'll need a light on in the room to operate until you get very familiar with the layout of the buttons.

    The Firefly includes 48 buttons - many of which you will not find on a traditional, universal remote control.  Things that expose the Firefly as the HTPC-specific remote that it is include the Maximize/Minimize Button, the Close Button, Right-click and Left-click buttons for instance.

    The keypad is organized in a familiar way that is fairly easy to get used to.  From the tope are the maximize and close buttons (HTPC specific) followed by the number keys, back enter, volume up and down on the left and channel up and down on the right.  In the middle is the firefly button which is large and sticks out from the other buttons.  This button's look isn't really for me, but it doesn't really take away from the remote and since it is called the firefly...

    DSC03856

    Next there is the info, option, menu and exit buttons all around the cursor control buttons in the center of the remote.  These easy-to use, 5-way menu cursor control buttons in the center of the remote have four directions and the ok button in the center.  Just below the menu and exit buttons are the record, play and stop buttons.  By the way, you'll notice from the photo that the menu and exit buttons can also function as the left and right mouse-click on your HTPC - something you won't find in your run-of-the-mill remote control.

     DSC03860

    Finally at the bottom of the remote is the rewind, pause, fast-forward, skip back, and skip forward buttons.  At the very bottom is a music, photos, dvd, tv, video, help, mouse and then the programable A, B, C and D buttons.

    DSC03864


    Overall, I was happy with the button layout.  The buttons I use the most are where I would expect them to be.  I also liked thought the "activity" buttons such as the music, photos, dvd etc are all at the bottom of the remote since they would be used less often. 

    FIREFLY RF RECEIVER

    DSC03909

    Since the Firefly is an RF remote, it requires a receiver that attaches to your HTPC through the USB port.  The Firefly has a black USB-attached receiver that is just over 2" wide and 3" deep.  The antenna that comes out of the back of the receiver is about 6" long.  The receiver has a red LED that tells you when its powered on.


    INSTALLATION

    1. Insert the 2 included AA batteries into the bottom of the Firefly Remote Control
    2. Install the latest firmware (1.2.1 has been the latest version for quite a while) using the included CD or download from the Snapstream website.  Install using the Firefly.exe.
    3. When prompted, plug the USB RF receiver into a USB port on your HTPC. DSC03875

    The instructions recommend you place the receiver in plain view, not covered by anything and not close to your HTPC, or AV equipment.  I tried placing the receiver in various places as much as the USB cord would allow.  My experience was that placing the receiver lower to the ground gave me the best reception. 

    The Firefly Remote Control ships with a limited version of Snapstream's Beyond Media program which may be useful for some, but it is fairly limited in usefulness so I expect that if you don't already have a favorite HTPC software program you'll be looking for HTPC software with more functionality.  You can purchase the full version of Snapstream's full-version of Beyond Media (I used to use this as my HTPC front-end) but even that program has been basically left to die on the vine so to speak as Snapstream has failed to update the software in any way (except for adding ability for it to work with Vista) for several years now.  Instead, I recommend you use it with Beyond TV, SageTV, Media Portal, Media Center, GBPVR or any of the other excellent HTPC programs available.

    While I don't recommend you use Beyond Media Basic (or Beyond Media for that matter) Beyond Media Basic is installed with the Firefly driver and is required even if you never plan to use Beyond Media Basic.  This is something that should definitely be changed with the installation.  There are alternatives to using the installation software with Beyond Media Basic which I'll cover later.

    CONFIGURATION

    Once you've installed the Firefly drivers, you'll see a screen with setting that ask if you want to use Windows Media Center Edition or Beyond Media Basic as the primary media software.  Then you'll see a short five screen tutorial that explains most of the functions with a description of each of Firefly's buttons.  After the tutorial is complete, you can configure the receiver to recognize more than one Firefly remote, enable/disable the on-screen display (shows any time a remote button is pressed) and set the Firefly to run on PC startup.  Next you can set the Beyond Media Basic "interface settings" which I didn't use.

    The final settings to be configured are the bottom activity buttons found at the bottom of the remote.  While the box the Firefly comes in says it supports over 80 devices with more to come (that's what was initially said by Snapstream), it still seems to support those 80 devices with few updates by Snapstream since.  While this is disappointing you'll find that there are some excellent alternatives that make the Firefly work with almost any device just as you would expect it to.  You then configure the media buttons, the "A, B, C & D" activity buttons and the "firefly" button.  Using the configuration software this process wasn't as easy as I had hoped since you can't easily assign programs to these buttons.  Read this post on the Snapstream Forums to learn about configuring these buttons using the Firefly Profiles,

    COMPATIBLE PROGRAMS

    As mentioned above the Firefly controls a wide variety of media apps out of the box, including Beyond TV and it can be customized to support additional programs as well.  Unfortunately, many newer versions of programs are not supported out-of-the-box.  For instance the latest version of PowerDVD (7 & 8) and Quicktime weren't supported out-of the box.  This meant I would have to do some searching and work to get the remote to control things the way I wanted which takes away from the easy of setup.  There is a solution which involves checking out the Snapstream Forums for the user-created Firefly profiles for various programs.  This was fairly easy for me, but I would expect the process to be easier for most HTPC consumers.

    So what do you do if you don't find a profile that does what you need it to?  While it's not really mentioned much in the documentation, there are two tools that install with Firefly.  ProfileEditor.exe and AppIdentifier.exe are both used to create and edit profiles and work to get your firefly working the way you want it to.  This gave me the flexibility I needed, but it took quite a bit more work than I expected - even for a HTPC remote.

    USING THE FIREFLY REMOTE

    Using the default firefly driver and software, the remote works fairly well.  It can control those devices as listed in the installation, but go beyond that and it takes a bit more work.  If you plan to use it with Snapstream's Beyond Media or BeyondTV it works very well indeed.  Button presses provide quick response in these applications and work just as you'd expect them to.  There's even a mouse mode (hit the mouse button toggle) to control the mouse on the HTPC -something nice and not often found on remote controls.  With some extra work and time, I was able to configure the firefly remote control to work with non-Snapstream HTPC software such as SageTV, Media Portal and GBPVR.

    BIGGEST DRAWBACK TO THE FIREFLY REMOTE CONTROL

    My main problems with the Firefly Remote Control are the fact that it cannot control your TV, your AV receiver or any other IR-based device unless you install another third party software such as girder or eventghost.  It is possible, but it requires another device such as the USBUIRT and another piece of software.  To me this is the biggest bummer of an otherwise excellent remote control.  The one other thing I didn't like is the difficult process of finding and configuring profiles that enable the firefly to control other software programs not included in the initial install. 

    ALTERNATIVES TO THE DEFAULT SNAPSTREAM CONFIGURATION SOFTWARE

    If you like the sound of the RF-based Firefly Remote Control, but want more than the default configuration software the Snapstream provides, I recommend you check out the LM Remote KeyMap program.  This software replaces the Beyond Media Basic software that comes with the Firefly and is updated regularly to handle many additional PC programs.  It also handles other popular, PC remote controls as well.  LM Remote allows you to easily assign a wide range of functions to all of the Firefly Remote Control buttons using it's friendly graphical interface.  Launch and control many programs, keystrokes all within it's program.  It's really the configuration software that should have come with the Firefly and I consider it a must-have for any Firefly Remote Control owner.  The standard version of LM Remote is free, but the full version is donationware.

    Girder is another excellent option that with the USBUIRT can add that missing functionality of controlling your other AV components including the TV.  Eventghost is another option like girder and it's even free.

    FIREFLY RESOURCES

    CONCLUSION

    Pros

    • Inexpensive
    • Capable of completely customizing with alternative software
    • Nice button layout with specialized HTPC function buttons
    • Mouse control
    • Excellent range - RF through cabinets and walls
    • Many user-based alternative solutions to the default driver/software

    Cons

    • Cannot control IR-based devices such as TV or Receiver
    • Driver/Software that comes with remote hasn't been updated much - difficult and time intensive to setup
    • Sometimes finicky about RF receiver placement

    Snapstream's Firefly Remote Control is a well thought out design that was made with HTPCs in mind.  If you're willing to put in a little extra time to get it configured just right, you'll have an excellent HTPC remote control.  Just know that without some extra hardware and software, you cannot control your TV or AV Receiver power and volume.  With those reservations I recommend the Firefly Remote Control for HTPC users.  There are many satisfied Firefly users that you will find using Beyond TV, SageTV, MCE, Vista Media Center, GBPVR, Media Portal, MythTV, Meedios and many other popular HTPC programs.  That alone proves the success of the Firefly.  Thanks to Dave Zatz and Rakesh Agrawal for giving me the chance to review the Firefly Remote Control.

    You can purchase the Firefly Remote Control from Snapstream at this website for $49.95.


    Snapstream also sells a mini version of the Firefly Remote Control aptly named the Firefly Mini.  I'll be reviewing the mini in the next few days for comparison.


    FIREFLY MINI ON LEFT AND FIREFLY RF ON RIGHT

    DSC03898

    Monday, March 17, 2008

    Auto Tennis Ball Thrower - For Your Dog

    I love dogs - especially the smart, but geeky dogs so when I saw this video of a dog putting a tennis ball into an automatic ball throwing machine, I had to share it with you.  This is the perfect thing for the lazy owner who wants his dog to be in better shape than he is.  Still, it would be a great gadget to keep Fido busy while he's home alone and your slaving away at the office.


    Found at Make Magazine


    Check this post out for more gadgets to geek out your dog.  I especially like the dog goggles from that post.

    Thursday, January 24, 2008

    Another Beautiful DIY Photo Frame - Pico Bayard

    pico bayard dpf 2Long-time readers of the Geek Tonic Blog will know that I'm a huge fan of DIY Digital Photo Frames and have made a DPF from an old laptop for myself.  Well a guy who I think makes some of the most interesting and beautiful DPF's has a new one I wanted to highlight.  Jeffery Stephenson, the same gentleman who made the stunning Skyscraper Photo PC that I highlighted last August has been continually innovating with new PC/DPF designs since then and his most recent creation is the Pico Bayard Photo Computer.

    Jeffrey describes his creation:

    “This computer was inspired by a design by the French clockmaker Bayard. It is an example of the art deco skyscraper school of design that flourished between the world wars. The clock’s landscape orientation was rare for the period.”

    The Pico Bayard hybrid computer/digital photo frame is powered by a VIA PX10000 Pico-ITX mainboard. The board has an integrated 1GHz VIA C7 CPU and 1GB of Crucial DDR2 memory installed

    Jeffrey's Humidor PC was noticed by several mainstream tech blogs.  Jeffrey specializes in making incredibly attractive and useful, custom PC cases that use tiny ITX boards. His creations are so good they are really as much a work of art as they are technologically cool.  You can catch up on his collection of projects on his SlipperySkip.com site.

    pico bayard dpf

    Wednesday, January 16, 2008

    Apple TV - Take 2 Still no DVR?

    appletvI watched the announcements for the second incarnation of AppleTV yesterday after the Macworld Keynote Address by Steve Jobs.  I was watching for a few particular features that I think would make the AppleTV actually take off.  Did Apple come through?  Well here's a quick rundown of the new features for the Apple TV Take 2:

    • Price (suggested retail): $229
    • 40 GB storage or for an extra $100 you get $160GB (not much storage for the price in my opinion)
    • AirTunes support for Apple TV for streaming directly to the device.
    • TV Shows $1.99 per show
    • Movie Rentals (HD movies with 5.1 Surround for $3.99; $4.99 for new releases) - You can get them but you can't move the movie out of the Apple TV if you acquired them on the AppleTV.  So no portability there.  Another potential downer for me is once you start viewing a movie, you have to complete watching it within 24 hours.
    • DVD quality and HD quality + Dolby 5.1.  No other codec changes that I could see
    • No computer required to run it since you can link directly to iTunes store via the Apple TV and download without a computer.  It does help to have a computer so you can sync content between the AppleTV and computer and vice versa though.
    • You can purchase music directly from AppleTV
    • You can browse audio & video podcasts
    • Ability to Sync content with youriTunes
    • Flickr photo browsing capability
    • .Mac photo browsing capability
    • Preview movies

    As I look at this I still wonder how much of a market there is for such a device.  Why you ask?  Well as a full-fledged HTPC user I certainly want the ability to watch liveTV and have DVR functionality Grant at ProjectHTPC was looking for this and Thomas Hawk agrees.  Is that just because I'm an HTPC hobbyist?  Well I think if you were to ask any of my non-technically inclined family some of which do have iPods and other gadgets they would say "where's the TV?"  "You mean I have to pay to watch one episode of TV that I can get on my TV already for free?"

    Apple did take care of several of my issues with the first version of AppleTV so it's certainly an improvement.  I love the small size, the silent nature of the hardware and such but it's just not enough for my needs.

    I think those are the questions your average household will be asking.  Apple will continue to sell the Apple TV, but I don't see it being a major success.  What do you think?

    Monday, December 10, 2007

    SageTV HD Extender STX-HD100 Review - Available Today

    DSC02614 (Medium)[2]

    Many Home Theater PC users have been clamoring for a silent, easy-to-setup extender that can handle High Definition video - a plug & play box that lets users remotely access their HTPC content from any TV in their home.


    SageTV is answering their customers desires by delivering a new HD Media Extender now available with their flagship Home Theater PC software SageTV. I had the opportunity to get a review unit to run through the paces before the extender was for sale so over the past week I've been giving this new SageTV STX-HD100 extender a workout by using it to extend my Home Theater setup. Read on to see how well the new SageTV extender performed.


    My Review Setup

    • Olevia HD (480i, 480p, 720p and 1080i resolution) TV
    • Yamaha Receiver
    • Network connected via modified, Linksys WRT54G router
    • SageTV installed on a PC running Windows XP in the office (connected to Living Room TV).
    Requirements
    • SageTV Media Center installed and fully configured on a Windows, Mac or Linux computer.
    • TV with AV, S-Video or HDMI inputs
    • Ethernet network cable that connects to your SageTV server

    What's Included?


    DSC02472 (Medium)

     
    The extender is shipped in a fairly standard white box with details about the contents and the SageTV logo on the side.


     DSC02484 (Medium) DSC02481
    Included with the extender is the IR remote control, two AAA batteries for the remote, a standard ethernet network cable and a standard composite AV cable. Also included is a small, 10 page setup guide that I read in its entirety in a few minutes time. The setup guide directs the reader to SageTV's website for further detail (which wasn't live at the time of my review.) The setup guide explained the easy setup process sufficiently so I had no need for further instructions. Obviously if you are new to SageTV you'll need to spend some time getting your SageTV server PC setup and working before messing with the extender, but since I already had the SageTV server setup, I had no problems and had it working in less then 10 minutes. While they did include a composite AV cable, It would be nice if they had included some HD cables such as HDMI and component cables. Fortunately I had some extras laying around and used those to hook up to my HD television.


    Design

    DSC02614 (Medium)[2]DSC02502 (Medium)[2]
     
    The extender unit is black in color and a little smaller than a typical DVD Player (9 inches deep, 14 1/4 inches wide and just under 2 inches tall). It's very light, silent and would fit in an entertainment center or just setting next to the TV. Looking at the front of the case, there are two USB ports on the front of the unit that are currently not active. Hopefully these will be supported in future firmware updates with features such as usb keyboard/mouse support, external hard drive support etc - keep in mind any future use of these usb ports have not been confirmed or detailed by SageTV thus far.

    Both sides of the extender have vents, but no fans so noise was non-existent. After multiple hours of streaming video content the box was still cool to touch as well so heat doesn't seem to be an issue either.

    DSC02599 (Medium)[3]


    Looking towards the back of the unit you will see the power cord, an on/off switch, the AV connections and the Ethernet Port. Note that the power supply is built-in to the unit so no power brick to deal with. All-in-all the box looks sleek and is small enough to fit in any environment.

    DSC02627 (Medium)[4]DSC02629 (Medium)[4]DSC02628 (Medium)[4]


    STX-HD100 File Format & Codec Support
    The HD Extender supports the following file formats:
    AVI, ASF, MPEG, MKV, QuickTime, MP4, Ogg, WMV, VOB (including with AC3 audio)
    Video Codecs Support: MPEG-1,MPEG-2 MP@HL, MPEG-4.2 ASP@L5, H.264 up to 1080p, WMV9/VC-1 up to 1080p

    Audio Codecs: MPEG Audio, AAC, Vorbis (stereo only), AC3 (decode/pass-through), WMA, FLAC, DTS (pass-through)


    Remote Control

     Remote-Layout[3]DSC02532 (Medium)[4]
     

    The above photos include the remote layout and the HD Extender Remote in the middle of the center photo with the Hauppauge MVP remote on it's left and my URC MX-500 remote on the right for size comparison purposes.


    DSC02538 (Medium)[2]

    The above photo to the right shows the top, front of the HD extender remote where the IR emitter is located.

    The remote has all of the functions you would expect and several more that any SageTV user would appreciate. The one thing that is missing from the remote is the ability to control your television set. This is unfortunate, but not a deal-breaker.
    The responsiveness of the extender for each button press was nearly instant - no noticeable lag. The range however was pretty good as I could control the extender with the remote from more than 20 feet across my Family Room. The remote does seem to suffer from some minor, line-of-sight issues so at times I had to be sure the remote was pointed directly at the box. This line of site problem was less of a problem when the extender was placed lower to the ground so I'm guessing it has to do with the placement of the IR receiver on the extender. UPDATE: SageTV has corrected this problem for any new units being shipped and offered a fix for those units that already shipped with IR issues. Read more HERE
    One notable thing to mention while on the topic of remote controls. I was able to control the extender with my hauppage remote control that came with my Hauppauge MVP (now used as an SD extender for SageTV.) I've also heard rumors that the MCE remote is compatible with this extender, but since I don't have that type of remote I can't confirm it.

    Installation

    Installation was quick and seamless. First you need to have the SageTV Media Center installed on a computer in your home of course, set up some firewall setting on your home network and enable the Media Extender Server. You connect the extender to your network with an ethernet cable, then connect the audio and video to your TV and/or AV Receiver. Then you plug in the AC plug, turn the power switch to on and wait for the HD Media Extender boot menu to come up (see screen-shot below).

    DSC02565 (Medium)[3]
     
    Next select the settings button and you will see the following menu to adjust the various settings for the extender.

    DSC02566 (Medium)[3]
     
    Check to see if there is a firmware update available, adjust the network, video and audio setting as needed.

    DSC02570 (Medium)[2]DSC02574 (Medium)[2]
     

    DSC02576 (Medium)[2]
     
    Now you can select your SageTV server (there will only be one listed unless you have more than one in your house) and it will load up the menu screen just like you're used to seeing on your SageTV Media Center.

    DSC02522 (Medium)[2]
     
    You'll note that since I haven't entered the license into the extender so it has the 15 day trial warning on the screen.
    That's all the setup required. You can also customize the look and feel of the extender as well as install plugins to modify the extender as desired..


    User Interface

    DSC02550 (Medium)[2]
    Just as they did with their SD Extender, SageTV made the user interface on the extender mirror the SageTV server interface. Anyone familiar with the SageTV HTPC screens will feel right at home with the HD Extender. Each of the SageTV plugins (STVi's) I tried worked fine on the HD Extender. As I mentioned above, the interface is very responsive to the remote - more-so by far than our old Time Warner Cable DVR box. Changing channels and jumping through the menus on this extender were extremely fast. The user-interface animations worked well on it and you definitely do NOT get the feeling you are dealing with a Home Theater PC here. It just feels like an extension of your television albeit a much more powerful and useful one.


    PERFORMANCE:
    Image Quality - The image quality on the STX-HD100 is excellent. The video looked excellent on my HDTV set and has plenty of power to handle video up to 1080p. I was very happy with the image quality for all video content - including Live sports broadcasts and news shows with the scrolling tickers that sometimes give HTPC's trouble.
    Sound Quality
    The HD extender has connections for HDMI, Digital Audio S/PDIF (Optical) or analog. Sound from the unit was excellent - I used the S/PDIF connections for the review.
    TV/PVR functionality 

    DSC02557 (Medium)[2]

    TV playback is key to my happiness with any HTPC device and this extender didn't let me down. It handled the HD content, SD content, live TV and TV guide all with ease. I had no issues with playback of recorded or live content. The extender handled comskip files (commercial detection and skipping of commercials) well just as I have come to expect from using HTPC's such as SageTV and Snapstream's Beyond TV.
    SageTV can tune unencrypted HD TV channels using several different QAM tuners, Over the Air HD and DVB tuners. It can also tune HD content using the firewire port of various cable boxes as well as the R5000 mod of certain cable and satellite boxes. Anything the SageTV HTPC software can tune can be streamed on to the STX-HD100 extender. I use the HDHomeRun Qam dual tuner and receive all of my HD content that way.
    Video/DVD
    Playing recorded, archived video files mostly worked well. I say mostly because the extender did lock up when playing a few large AVI video files a few times during my first two days of testing. Fortunately the firmware upgrade that was available for the box seemed to fix this problem so I would imagine this was something the SageTV folks were working on and fixed via the firmware update. This is an important thing to note because future firmware updates will likely take care of any bugs that may not have been discovered during beta testing. Other than those isolated issues with the DIVX video files (fixed with the firmware update), the extender handled everything I threw at it including Mpeg, AVI, DIVX, MP4, XVID and TS video files all with no problems.
    Online Video
    SageTV has YouTube, Google Video and multiple other online video you can view right from the menu.

    The extender handled playback of these videos well and integrated remote control functions such as pause, skip forward and skip back capability of that content with ease.
    Music & Pictures
    We played our Christmas music playlist streaming mp3 files stored on the SageTV server upstairs. All the functionality of your SageTV Media Center works exactly the same on the extender. Play, pause, skip to the next track etc all works perfectly from the remote control. As mentioned above the audio output from this box is excellent. While listening to the music playlist we were able to view a photo album showing past Christmas gatherings - all of this from the 10-foot interface via the remote control.


    Price - When I asked Mike Machado, CEO of SageTV about the HD Extender pricing, he confirmed the $199 price of the HD Extender:

    "Price will be $199 and it requires SageTV Media Center software. We will have a $249 bundle of SageTV Media Center software with the extender."

    The units will go on sale at the SageTV website today (Monday, December 10th) This price includes the extender, the remote as well as the required SageTV extender license. I think this price point will be well received by current SageTV users. And for potential new SageTV customers, the $249 bundle is a savings of $29.95 compared to purchasing SageTV and the HD extender separately. You would be hard-pressed to purchase a pre-made HTPC or build your own HTPC "extender" that had the STX-HD100's capabilities for that price - especially considering the small size and weight and silent operation of this extender.


    Conclusion
    Positives:

    • Excellent Media File Support - This extender can handle every media file I threw at it including MP4, MKV, H.264, FLAC, VOB with AC3 etc. Plus because of SageTV's support of OTA HD, unencrypted QAM, FireWire and the R5000, it can get it's HD TV content from many different sources.
    • Performance - The user interface is snappy and responsive. Playback of media worked smoothly with no noticeable lags or delays.
    • Silent - it might be making some noise in there, but my ears sure couldn't hear it. Compare that to your average HTPC that almost always makes a little noise at least or the XBox360 that Microsoft's Vista Media Center uses as an extender and you have the perfect media extender for your living room or even bedroom.
    • TV, Music, Photos, Videos, Movie and Online content all streamed with ease from one simple interface.
    • Cross-platform - This extender does require SageTV to be installed on a computer in your house to act as the media server, but remember that if you use Windows, Mac OSX, Windows Home Server or even Linux you can add SageTV to that PC as a server and connect this extender. If there's a software PVR that can handle this many different platforms out there I sure haven't found it.
    • Price - $199 for a powerful media extender is very reasonable and will be difficult for competing Microsoft extenders (when they do arrive) to beat.
    • No crippling DRM restrictions - You will find that SageTV will not cripple its software or hardware with DRM restrictions that prevent you from streaming or viewing certain content. This is another advantage over the Microsoft products.
    Negatives:
    • No Control of TV on/off - First off I'd like the remote to be able to control my TV. Having a single remote for each TV makes life easier in my house so it's a feature I would have really liked to see.
    • No optical drive - Another obvious missing item is an optical drive for playing the occasional DVD or CD. For me this isn't a big deal as I have plenty of DVD players and actually I rip most of the DVD's I own to my hard drive for convenience. Most media extenders will not include this feature but it would be nice to have.
    • No CableCard - Without CableCard ability in SageTV you are restricted from viewing or streaming encrypted, digital cable channels. Which HD channels are encrypted vary from one provider to another. Some cable providers keep many or most HD channels unencrypted while others only allow the local HD channels left unencrypted. Note that this isn't really a limitation of the extender as much as it is SageTV and any other company that doesn't have the cost-prohibitive and time consuming CableLabs certification (only Microsoft & TIVO currently have this.) SageTV does have the ability to tune via the FireWire port of some boxes as well as the expensive R5000 (modified cable/satellite boxes), but I mention this as it is an issue for most HTPC's in general.

    Overall
    I was very impressed with my overall experience with the SageTV STX-HD100 extender. It matched my SageTV interface almost exactly and handled just as well as the SageTV server does with a much easier setup than a full-fledged HTPC box. The only issue I had with the extender was one that was easily fixed with a firmware update. The positives listed above far outweigh the negatives. This extender gives you the ability to place your digital content (TV, Movies, Music and more) wherever you want it - all in a small, silent box that's affordable.
    As Chris Lanier pointed out, SageTV has beat Microsoft to the market with an excellent HD extender that can handle about any file format you throw at it with great picture and sound quality. I highly recommend the SageTV STX-HD100 to anyone who owns or is considering the SageTV HTPC software for their Home Theater PC needs. This new HD extender by SageTV is an excellent solution for getting your media from your HTPC to your bedroom, living room or anywhere you have a television.


    How to Purchase
    If you're interested in this extender head over to SageTV's Store to order one now or to SageTV's HD Extender Information Page for further details. As this is a review unit, I won't be keeping this one, but I liked it enough that I'll likely purchase one early next year. Thanks to the guys at SageTV for the review unit. By the way, be sure to check back here at Geek Tonic and at ZatzNotFunny later this week for a special surprise.
    About SageTV:
    SageTV, LLC is a pioneer in DVR, home media center and home media server technologies that combine television, video, music, photos and online content into a complete, easy-to-use home media experience controlled from an existing PC or home server. SageTV Media Center, the company’s flagship product, can be deployed on either Windows, Mac or Linux and supports multiple tuners, networking and intelligent recording and includes support for a software extender, a hardware-based SD extender and now an HD extender. SageTV also has the ability to access the SageTV experience when you're away from home with SageTV Placeshifter. The company was founded in 2002 and is based in Inglewood, CA. For more information, visit www.sagetv.com.

    Tuesday, November 20, 2007

    Interview with Snapstream's Rakesh Agrawal

    RakeshAndBrent
    I've been a Beyond TV & Beyond Media (both Home Theater PC products) user for the past three years.  So when I saw that Rakesh Agrawal, the founder and CEO of Snapstream would be in Kansas City to talk about his company's latest project, Snapstream Enterprise I jumped at the chance to meet with Agrawal to hear about what Snapstream is working on and learn more about Agrawal and the company. 
    Rakesh was generous enough to sit down with me and answer several questions I had for him.  Over lunch, we talked about Snapstream's history, the change in their industry, Snapstream's new Enterprise product, the effect of Microsoft Vista on Snapstream, Integration of DVD & Music playback with Beyond TV and many other topics.
    HISTORY OF SNAPSTREAM AND BEYONDTV
    I asked Rakesh how he initially became interested in the Software PVR market.  He explained that the idea took hold when traveling on business.  "We needed a way to stream our shows to the hotel room from our home.  That grew into a concept that became Snapstream Personal Video Station."  Personal Video Station  was even showcased in Bill Gates keynote address at the Windows XP Launch which is ironic since Windows eventually added their own PVR program to their Windows Operating System. Version 3 of Personal video System was launched in May 2003 and in November of 2005 the latest version of Beyond TV  BTV4 (note there has been many free upgrades since 2005) was released. 
    HOW HAS THE SOFTWARE PVR BUSINESS CHANGED?
    Our conversation moved on to how the Software PVR business has changed since Agrawal started Snapstream back in 2000.  Snapstream moved on from "Personal Video Station" to Beyond TV and then Beyond Media (Snapstream's HTPC media front-end software)  These two products were developed separately and continue to act as stand-alone products today.
    Screenshot of the Snapstream Website in 2002
    Snapstream2002
    Agrawal said Snapstream's focus had been driven by the knowledge that "the consumer wants something that just works."  Snapstream has strived to be the leader in providing the easiest out-of-box experience for their Home Theater PC PVR software although Agrawal feels there is still a ways to go in making the Home Theater PC a product that is accepted by the majority of consumers.  Even though Snapstream's Beyond TV is one of the easier to set up, the Home Theater PVR still requires some real, computer knowledge and the willingness to work at setting it up.
    Want to see how the program has evolved since 2003?
    Check out the Snapstream Release Notes

    SNAPSTREAM'S ENTERPRISE PRODUCT A NEW MARKET FOR THE PVR
    Our discussion of the changes in the PVR business and how it Snapstream has evolved with those changes moved on to Snapstream's latest venture - Snapstream Enterprise.  Up until the past year or so Snapstream has focused on the consumer/home PVR market.  I asked Agrawal what prompted the move into the enterprise market?  Agrawal says "we saw a market for a hardware/software combination product that would handle the media monitoring needed by public relations and public information organizations to monitor and respond to TV coverage."  Snapstream calls their enterprise product an "appliance" since they are selling a high-powered server hardware with all of the software configured and ready to use. 
    A graphic from Snapstream's Enterprise Website.  Note they are selling the product as an "appliance."
    Enterprise1
    Actually, the enterprise product is the reason Rakesh was in Kansas City in the first place.  He was at a trade show for the nationwide city & county marketing association.  Rakesh said Snapstream is attending many similar conferences and trade shows where they are trying to learn about potential customers who might have a need for the enterprise product and give them an opportunity to show off the product.
    Many of the organizations Snapstream is selling to still use VCR tapes or TIVO's to record media coverage of interest to that organization.  Managing such a library and constantly setting up the recordings can be an overwhelming task without the high-powered media server like what Snapstream offers.  To get a good idea of the enterprise product and what Snapstream is selling to government organizations, political organizations and professional sports teams; check out the video demo they have up on their Enterprise website HERE.
    When I asked about the balancing of development time between Enterprise & Consumer products, Agrawal said that "Snapstream Enterprise is still an experiment, something that we're continuing to explore.  There are a lot of complementary features that might be developed for one version that would be carried over to the other version and vice versa.  For example, the iPod integration we built into the last consumer release is something that we're now productizing in the enterprise version of the software.  While the balance in the past year has been about 50/50, it's hard to say what it will be in 2008.  Maybe the same, maybe more of one or the other"
    If you had any doubt about how the new Enterprise product has taken hold at Snapstream, you need to look no further than the recent award won by Snapstream from "The Rice Alliance for Technology and Entrepreneurship" at Rice University's 5th Annual IT and Web 2.0 Venture Forum.  There, Snapstream was chosen as one of the "Top 10 Most Promising Information Technology and Web 2.0 Companies."  More interesting is the description of Snapstream's business used in the Rice University press release
    "SnapStream Media (www.snapstream.com) is media monitoring technology used by public relations organizations to monitor and respond to TV coverage."
    As Agrawal confirmed in our discussion, this of course doesn't mean Snapstream is leaving their flagship product Beyond TV, but it does reflect a significant new strategy for Snapstream to split their energies between Enterprise and Beyond TV.
    THE VISTA EFFECT
    vistabtvAlmost a year ago Brad Linder of PVRWire (now part of TVSquad) interviewed Rakesh(listen to the PVRWire Interview with Agrawal HERE) and one of the things discussed was Microsoft Vista and how that might affect Snapstream.  Agrawal at that time felt Vista would change and hopefully increase consumers awareness of PC/PVR's.  During my discussion with him he said this did not work out the way he had expected.  Because of Microsoft's struggle with driver support and stability, the widespread adoption of Microsoft Vista has not happened they way he had anticipated.  He thought the publicity and push by Microsoft for the HTPC would push PC makers to bundle the video card more with their PC products and this didn't happen.  He also thought that publicity from Microsoft for the HTPC would be stronger than it was.  In the end, Vista has not thus far become a "game-changer" for the media center market.
    STATUS OF COUCHVILLE WEB-BASED TV GUIDE
    Couchville, formerly known as the "Columbus Project" during its early development started with a bang when it was dugg by Kevin Rose himself (of digg.com) and reached the front page of digg.
    couchville
    Couchville is a simple but useful ajax-based TV guide site Snapstream developed last year.  The Couchville guide project was done separately from Beyond TV since BTV uses its own online web guide and there was once discussion of merging the Couchville guide in with BTV's online web-guide, but nothing ever came of it.  I asked Agrawal if there were any plans in the near future for Couchville.  He said that Couchville development was really in a holding pattern at this time and there were no plans currently for changing the site from its current functionality.
    INTEGRATION OF DVD, MUSIC & OTHER HTPC FUNCTIONALITY
    Another topic covered in Brad Linder's interview with Agrawal just over a year ago was the topic of integrating DVD playback, music playback and photo display among other media features with its flagship PVR product, Beyond TV.  In that interview, Agrawal implied that integration of Beyond TV and Beyond Media was possible, but didn't see where there was as much of a place for Snapstream to differentiate from the competition in this realm. 
    Beyond Media Is Snapstream's HTPC front-end software developed several years ago. 
    It hasn't been updated (other than adding Vista compatibility) for well over a year.
    bmbox
    Since that time, there has been some discussion on the Snapstream Forums of reworking the Beyond TV user interface to allow "Beyond Media-type plugins" as well as other desired features such as picture-in-picture.  I asked Rakesh if this was still in the plans.  He said that while this was still on the list of possibilities, there was no timetable and it wasn't one of their planned features for the near future at least.  Agrawal has said more then once that "TV is and will continue to be our focus" when asked about the Beyond Media/Beyond TV integration of Music, Movies and Photos into the Beyond TV interface and I think (my opinion, not necessarily Rakesh's) that this TV-focus continues to move the "integration" of these features lower on the list of priorities at Snapstream.
    He said that such a user interface overhaul would require a great deal of development time and resources.  Instead their plan was to develop features for both the enterprise and consumer products and port any complementary features from either version to the other where appropriate.  He said there will be plenty of new features for both the Enterprise and Consumer products in the next versions, but didn't speculate on what those might be.
    HD, QAM, DVB AND CABLECARD - IS CABLECARD IN SNAPSTREAM'S FUTURE?
    cablecardAs more and more consumers purchase HDTV's for their home, the desire to be able to tune HD content on their PVR's will become greater and greater.  Snapstream has had the ability to tune OTA (over-the-air) HD content for two years now since the release of BTV 4.0 and in April of this year added the ability to tune unencrypted QAM through the HDHomeRun Tuner Card.  In a conversation with Agrawal since our interview he mentioned that there are plans to support more 3rd party QAM devices out there although there isn't a specific schedule for that at this time.
    Even with the HD tuning ability available through OTA and unencrypted QAM tuners, Snapstream's Beyond TV as well a most other HTPC software products available today cannot tune HD content encrypted by Cable and Satellite providers.  The only HTPC product with this capability thus far is the Microsoft Vista Media Center with the Cablecard tuner built-in (only pre-built HTPC's).  When asked about Cablecard support, Rakesh stated that as it is today, he doesn't  see any way for smaller companies without the name Microsoft or Apple to offer the Cablecard tuning in their products.  Rakesh also said he felt the Cablecard had been pretty much a "bust" considering the hefty investment Microsoft likely spent on it. 
    WRAPUP
    That covers much of what we discussed last month.  Being a long-time user and fan of Snapstream's products this was a great experience for me.  Many thanks to Rakesh for taking the time to meet with me.  My impression of Rakesh is that he is a very down-to-earth, intelligent and super-nice guy.  I could tell from the short time that I spent with him he really enjoys what he does.
    If you're interested in Snapstream's consumer or enterprise products head over to Snapstream.com for more information.   If there's anything I didn't cover that your curious about or if you want my opinion on anything I've discussed above, please let me know in the comments and I'll do my best to respond.

    Interested in more articles on Home Theater PC's?  Click HERE

    STAY UP-TO-DATE AT THE GEEK TONIC BLOG & SUBSCRIBE IN RSS READER
    OR SUBSCRIBE TO THE POSTS BY EMAIL