
When checking out new houses, I usually notice the whole house audio integration they build-in, albeit I was never a big fan of mounting speakers into the walls everywhere. Similarly, there are pretty neat home automation controls that use touch screen interfaces to control the various devices in your house. I always wanted something similar in my house, yet never saw the point in spending thousands of dollars on it. Now with computers becoming significantly more affordable I figured there’s got to be a way to set up a system with a nice touch interface. There are monitors available that provide a touch interface that start at a little less than $400. However, I wanted a system that I can mount to the wall with as little wiring as possible.
NOTE: This is a guest post by Thomas, a fellow HTPC enthusiast. Thomas has an interesting setup and his talk of a touchscreen HTPC client caught my eye.
While looking around, I came across the Shuttle X50, which is pretty much a 15.6 inch touch screen monitor with a built-in computer. It sports an Intel Atom 330 processor (1.6 GHz, dual core), built-in WiFi and sound, Intel GMA 3150, and an integrated webcam. Shuttle sells this as a full system or as a barebone. However, the barebone is considerably cheaper so I went for that. As a barebone it still needs the memory and hard drive to be installed. Specific information about this system is rather scarce, even on Shuttle’s own web site and the documentation that comes with it does not provide any more details. At the store, we actually had to take it apart to figure out what kind of hard drive and memory it needs. To save everybody from going through the same hassle, it actually needs notebook-style DDR2 memory and a 2.5 inch hard drive. So I got 2GB of memory and a 160GB hard drive for it. The computer is a little tricky in terms of taking it apart to install the memory and hard drive as you have to disassemble pretty much the whole backside of it, including any shielding and mounting material. In my case, the friendly guys at Microcenter put it all together as we had to open it up to find out for sure what type of memory and hard drive it requires anyway. All in all, I ended up spending slightly over $500 on the system (I still had a Windows 7 license lying around that I was able to use for this system).
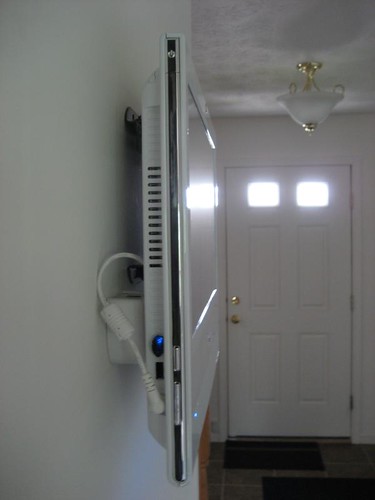
The Shuttle X50 comes with a little stand in the back that is mounted to the main case via a standard VESA wall mount. Hence, once this stand is removed any standard wall mount can be used. I then got the cheapest wall mount I could find in the local stores that allowed me to mount the system as flush to the wall as possible. In order to power the system, I drilled a whole into the wall located in such a way that it was covered by the computer later. In my case, the staircase to the basement is located on the other side of the wall. So I simply drilled another hole on that side, installed a power outlet in the staircase, and ran the power cable through the wall to plug into the new outlet. This way, there is no noticeable wiring around the touch screen computer and the white case of the computer blends in nicely with the wall. The following image shows the wall-mounted computer from the side. The white cable supplies power to the computer.
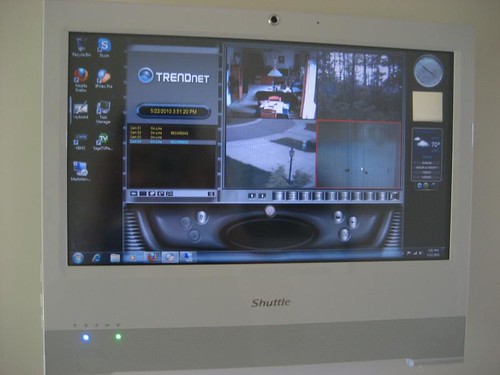
Touch-Screen Security Monitor
The main purpose of this system that I originally had in mind was to use it as a home security and whole house audio interface. So I installed the software that came with my Trendnet IP cameras which allows the computer to record from up to sixteen cameras. The dual core Atom processor is even fast enough to process the video feeds to only record when there is motion detected. I have four cameras hooked up and with hyper threading and the two cores there is basically one “processor” available for each camera to process the video feed and detect motion. The next photo shows the security camera software running on the touch screen computer.
A Touch-Screen HTPC
In order to use the system as a whole house audio system, I tried several different audio players, including Windows Media Center, xbmc, and winamp. None of them really worked too well for me with just a touch screen. The touch interface emulates a mouse in a sense that wherever you touch the screen, a mouse click occurs. On the downside, this means that there basically is no support for any “mouse over” events. At some point, some of these audio players required some key press or the sorting of the audio files seemed too cumbersome to work with (all my audio files are arranged in folders and I like to browse them that way). Since I use SageTV throughout the entire house, I gave that a shot on this system as well. I tried both, the SageClient and the SageTV placeshifter. While the SageClient works on the system, it is struggling with 1080i video content where it does tend to studder once in a while. For a secondary system this is OK, even fine when used for 720p or lower resolution videos. The placeshifter works just fine as the server transcodes the videos first to a lower resolution, which this system can handle very well. Since SageTV can be controlled via a mouse, the touch interface works very well with it. Since all menu entries basically resemble buttons, they can be selected by just tapping onto them on the touch screen. When using the latest version of SageTV, v7, you will have to enable “focus follows mouse movement” (at least in the first beta version) in order for it to work properly or otherwise selecting menu items may open up the wrong sub-menus. Both, the client as well as the placeshifter work perfectly fine for just audio files and the fact that I was already quite familiar with its interface made it appear even more appealing. Selecting audio files to play and generate a play list is very easy and intuitive with the touch interface as you can essentially just tap on the audio file to add to the queue. Similarly, you can move the scroll bars around to browse through the list of audio files by just tapping on the arrows at the ends, on the scroll bar itself, or drag it up or down. Overall, this makes for a very intuitive user interface.
Whole Home Audio Controlled by Touch Screen
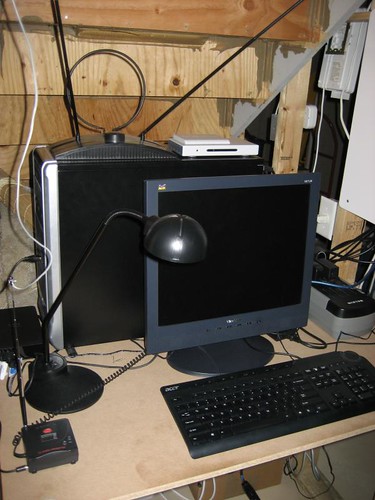
In order to achieve the whole house audio system I was looking for with this computer as the main touch-based user interface, I ended up going a slightly different route, though. This was mainly to reduce the amount of wiring in my house and to the system so that I only had to hide the main power cable going to the computer. The audio signal in my setup gets transmitted via an FM transmitter. I went for the C. Crane FMT Digital FM Transmitter as this model seems to be one of the better ones that actually can transmit throughout an entire home in stereo. The initial attempt was not overly satisfying as the distance it was able to transmit to was not that great. After searching through the internet, I found a couple of posts that tell you how to crank it up a notch (there is a potentiometer at the top inside the device that controls the output). These posts also recommended increasing the length of the antenna to the full 52 inches. So I just attached some copper cable I had lying around in the garage to get to that length. After these modifications, I was able to receive the signal properly everywhere in my house even with the transmitter being connected to my SageTV server in the basement. The FM transmitter can run on batteries but also comes with a power supply to deliver the necessary 5V. Just to get rid of yet another power supply for my setup I soldered together a USB power cable for it real quick so that the FM transmitter now is powered off of one of the USB connectors on my server. The following image depicts the SaveTV server in the basement with the FM transmitter in the lower left corner. The gray cable on the left is the antenna extension, whereas the black cable is the USB cable powering the FM transmitter.
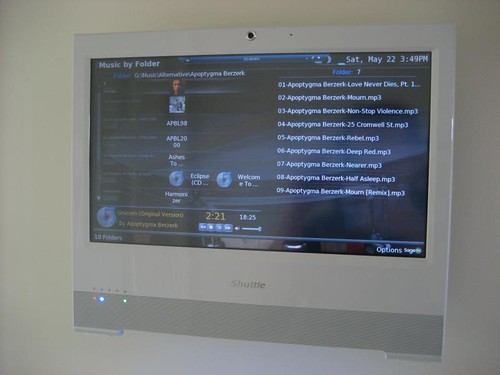
Since the FM transmitter is connected to the sound card on the server, I now had to get the server to play the audio files instead of the touch screen computer. Of course, I still wanted to use the touch interface to select which audio files to play. The simplest solution for that was to just connect to the server via a remote desktop connection. The credential manager in Windows 7 can store the necessary username and password combination for this connection so that I was able to just put a remote desktop configuration file with all the necessary settings (mainly to make sure that the server still plays the audio instead of rerouting it to the touch screen computer) onto the desktop that establishes the RDP connection without any additional user input. On the server, I created a separate account designated to this RDP connection that just always runs the SageTV client. This way, I can still use the main account on the server for maintenance without disturbing the audio playback capabilities too much. The RDP connection is by no means fast enough to play video properly; but for selecting audio files it is still fast enough even with animations enabled in SageTV. This next picture shows the SageTV music interface running as a remote desktop session on the touch screen computer.
All in all, this setup works very well for me and provides a very nice user interface to my house. As described earlier, it lets me select any of my music files available on the central server in the basement. In addition, it shows all the camera feeds of the security cameras so that I know what is going on around my house if need be (and it records everything in case something happens while I am out of the house). Since it is a regular computer, you can essential install anything you would want this computer to do. For example, I installed a weather gadget to always have the current weather displayed on the main screen. There is usually also a web browser running all the time which can be used to check up on something real quick. The web browser also allows me to connect to the home automation web server in my house that controls light and other devices in the house via the X10 protocol using a firecracker module. Overall, this small touch screen computer makes for a nice and intuitive user interface that can more than compete with many (significantly more expensive) commercial home automation and whole house audio systems. On top of that, it can serve many additional purposes, such as quick web browsing etc. As usual, your imagination is the limit in what you use something like this for.
About the author: Thomas is an Assistant Professor for Computer Science and Engineering at Wright State University. He is an enthusiastic user of HTPCs for over six years. Starting with a simple setup using myHTPC and GotTV, he quickly moved on to SageTV to establish a whole house media solution.