


I personally have enjoyed the “art” of making do-it-yourself digital photo frames out of old laptops. Yes, the DIY digital photo frame is a great project that is economical and a downright rewarding project. But those DIY digital photo frames also require some technical maintenance at times since they still are just computers inside. Getting photos on and off of the frame, rebooting, Wi-Fi issues etc all can be deal-breakers for the parents and grandparents. Even geeks like me can appreciate the “it-just-works” kind of gadget.
I first learned of the Kodak Pulse at ZatzNotFunny! when Mari did a hands-on with the smaller, 7-inch version of this frame. Mari’s verdict of
“If you want the grandparents to be able to plug in a digital frame and forget about it, the Kodak Pulse is a clear winner.”had me hooked, but the 7” frame was simply too small for my taste. I was already used to a larger, laptop-sized DIY frame and wasn’t willing to sacrifice that size – especially for the price at the time. Thankfully they released a newer, larger version of this frame last month and I’ve been trying it out for about a month now. Read on for my take on the 10” Kodak Pulse which is basically just a larger version of last years 7 inch digital photo frame. It’s touch-screen, has a nice, bright display that is the same 800x600 resolution as the 7 inch version and it comes packed with Wi-Fi, multiple memory card format support as well as USB.

Read on for the Complete Review
SET-UP
The Kodak Pulse comes with a quick start guide that gives you the basics of setting it up, but it isn’t that difficult and most could figure it out without reading it. Plug the frame into an AC socket using the power adapter and the the Pulse will turn on automatically. There’s also a power button on the back of the frame to manually power it on and off. Setup can all be done from the touch-screen interface on the digiframe. There’s also a Kodak Pulse web page for your digiframe where you can adjust the settings after the fact if needed.
The first time you plug it in you complete the basics like setting the language, connecting to the wireless (802.11b/g or b/g/n) network (enter your WiFi code), and a couple of other settings right from the frame. You’ll also need to activate the frame using the included activation code. Once you enter your activation code, you’re basically set.
They also give you a way to gift the frame to someone without going through all of the activation process. The packaging includes a label with a special “gift” activation code so you can get it set up at www.kodakpulse.com This allows you to gift-activate it and add some photos on it for the person you’re gifting it to which makes for an especially nice out-of-the-box experience for the person receiving it.
Getting Photos on the Frame
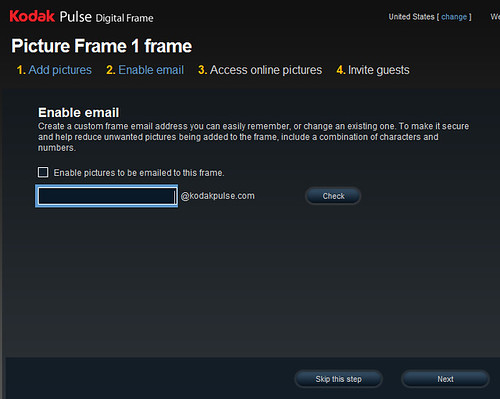
After knowing what types of photo files the digiframe accepts (JPEG including EXIF info), The first question I get when talking digital photo frames is how do you get pictures on that thing? With the Kodak Pulse you have options – options that will please everyone from the grandma who needs others to get the photos on the frame all the way up the gadget geek like me.E-Mail – One of the more unique and smart ways you can get photos to this digiframe is by e-mail. During the setup process you can choose a unique e-mail address for your digital frame. With this e-mail address you and anyone you give this address to can send photos to the digiframe. That means you can send photos from a camera phone, a computer or anything that allows you to send photos by e-mail. It doesn’t get much easier than that. Just don’t give the e-mail to buddies you don’t trust since they could send any photos they want to the frame…
Memory Card – Take about any camera memory card (SD, SDHC, MMC, MS, MS-PRO, MS Pro Duo and xD) drop it in the memory card slot and the photos from the card pop up on the display.
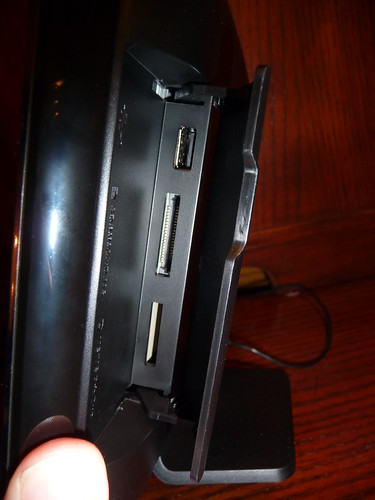
USB – Transfer photos to the digiframe using a USB flash drive.
Kodak Gallery – With an online Kodak Gallery account you can connect your digiframe to that account to automatically add photos from the online site. This takes a few minutes from the time a new photo is uploaded to the gallery before it makes it to the frame, but its a matter of minutes.
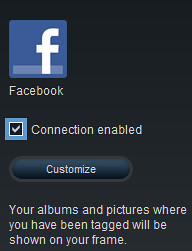
Facebook Photos – You can connect your digiframe to one or more Facebook albums and other Facebook friends albums. So if you wanted to share a certain family Facebook album with the folks, you would set up their frame to get any photos from that Facebook album. Just like with the Kodak Gallery, it takes a few minutes from the time a new photo is uploaded to the gallery before it makes it to the frame, but its a matter of minutes.
Easy Share Kodak Camera – Some Easy Share Kodak Cameras allow you to share a photo to the frame right from the camera.
Kodak Pulse Website – I nearly forgot about this method. From your personal Kodak Pulse website where you can change the settings etc, you can also upload & delete photos from here. Uploading requires selecting a photo or multiple photos from the computer you are using at the time.
The frame has 512MB internal memory which will be enough for most, although you can use the USB port to add additional memory.
Getting Photos off of the Frame
This may seem like a minor one, but it’s very important and something many digital frames forget. To delete a photo you can simply press the frame’s touchscreen and select the delete icon or delete the photo from the Kodak Pulse webpage. It’s easy and it works – very important.Display & Touch-screen User Interface
The 10.4 Inch, 8.3 x 6.2 Inch display on the digiframe is 800 by 600 – acceptable, but not amazing by any means. For comparison, my DIY digital frame I made from an old laptop runs with 1024 by 768. The screen has a matte finish to keep it from picking up too much glare in places where there’s lighting or sunlight nearby. I’d like to see a little bump up in the display resolution given the larger screen size, but honestly it will be just fine for most. Photos don’t come off as blurry, just not as crisp as they could be in my opinion.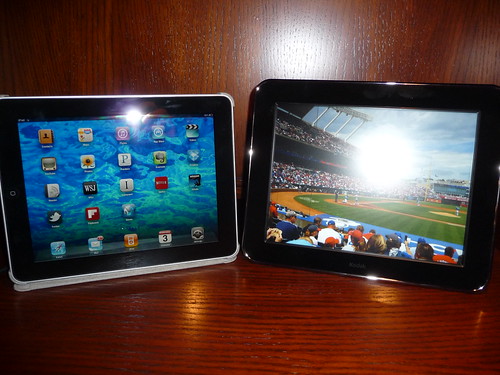
A look at the Kodak Pulse 10 Inch on the right sitting next to the iPad on the left
The Kodak Pulse uses a aSI TFT active matrix, LED backlit, touch-screen interface. This is good from a ease-of-use standpoint because you don’t really have to figure out what buttons do. It’s not an iPad-like touch-screen and does require a slight amount of pressure, but it’s perfectly responsive and worked well. Just be sure your hands are clean before mucking up the screen.
Using the touch-screen interface you can stop the photo slideshow, see info about the photo, manually switch back (or forward) one photo, switch from full-screen to collage, delete a photo, change the transition type (wipe, fade, zoom & pan) and the transition speed.
You can also select a group of photos to cycle through. Say you want to only show photos that came from a certain e-mail address, or only a certain Facebook photoset just select those and press play.
I recorded a very short video to show you how the touchscreen interface works:
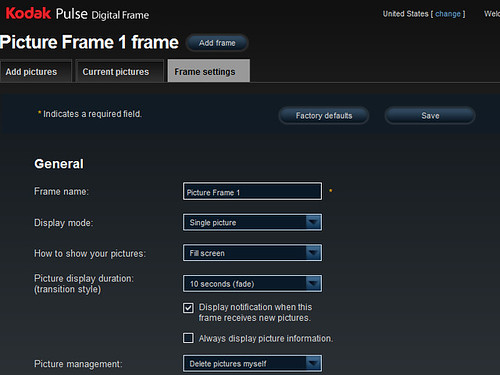
Online Frame Settings
As I mentioned above, Kodak offers a special Kodak Pulse configuration website for your frame. You’ll have a username and password to access this and from this page you can do the following:- Add Photos
- Manage Photos including delete one or more photos, view all photos on the frame, and see info about each photo
- Name your digiframe
- Change the display mode between collage & full-screen
- Show photos with full-screen or entire photo
- Change transition style and speed
- Always Display information about photo by default (toggle)
- Display notification when new photos arrive to frame (toggle)
- Change picture management to only delete photos manually, or auto-delete oldest photos when the digi-frame runs out of memory
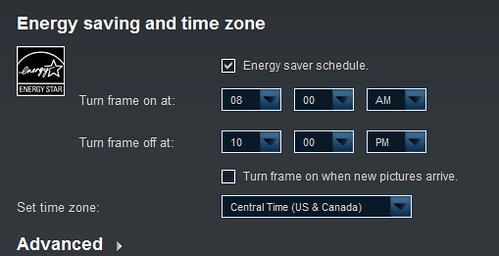
- Set time for frame to automatically turn on and off during the day – Another great feature that puts the frame to sleep at night or whenever you choose to save energy
- Set language
Price
The 10” version of the Kodak Pulse which is the one I reviewed starts at $199 list price. But I found it for $179.95 at Amazon for the 10-Inch Kodak Pulse. If you don’t mind the smaller size, the older, Kodak Pulse 7-Inch Kodak Pulse is selling for a great price of $102.95 at Amazon!Conclusion
So is the Kodak Pulse really the “effortless” digital photo frame like they claim? I would say, definitely yes. The Kodak Pulse is amazingly simple to use, has a excellent options for getting photos onto the frame with it’s own e-mail address and Facebook photo integration (among others) and the touch-screen UI for managing photos and the slideshow is ideal. If you’re looking for the perfect off-the-shelf digital photo frame that is easy enough for the folks to use – look no more. The Kodak Pulse is one of the best gadgets you can buy – I’m sold on this digital photo frame and plan to gift it to a lucky family member.Note: This digital photo frame was purchased for the purpose of giving it as a gift after reviewing.