Showing posts with label Tutorial. Show all posts

Tuesday, November 24, 2009

Stop PowerDVD Autoplay

One of my biggest software peeves is when a software program assumes it should control the behavior of your computer without the ability to easily change that behavior.  Cyberlink PowerDVD is one of those programs – I use it sparingly on my HPTC server for playback but mostly for the codecs it installs.  But when you install it it changes windows autoplay settings so that just about any media disk you put in your drive, it automatically starts PowerDVD and begins playing the media.  Now maybe that’s how some users want it, but I don’t.  Typically I’ll be viewing my media through my HTPC program – not PowerDVD.

PowerDVD Logo

So how do you disable the autoplay?  I’ve tried going through the settings in Cyberlink and they just don’t work.  So instead we’ll use Windows settings to do this.  With Vista or Windows 7 follow these simple steps:

full how-to with screen-shots after the break

Wednesday, June 24, 2009

Control Your HTPC With EventGhost

Controlling your HTPC with the 10-foot interface (aka remote control) is one of the first things you need to figure out when setting up the HTPC.  Some HTPC programs have built-in ways to deal with this, but even then you might need a little more power or control.  EventGhost is a very nice freeware that helps you do this and ZetaVu has written the following guest-post explaining how he set up EventGhost to control his HTPC.  Read on for a great how-to article:

NOTE:  This is a guest post by ZetaVu, a GeekTonic reader and frequent guest-blogger on GeekTonic.  Basic guidelines for writing and submitting a guest post at GeekTonic can be found here.

I had been an avid user of Girder with my remotes on my HTPC. My main programs are Snapstream Beyondtv and Media Portal, but have also used Beyond Media when it was actively supported. My goal was to program the same remote buttons to have similar functions in either program (as well as Firefox Keyconfig shortcuts). The remotes I use are an ATI All in Wonder RF remote, and the Hauppauge IR remote that came with my HVR 1600 capture card. The reason I used Girder was that it let me assign custom actions to any button on my remotes. The reasons I stopped using Girder were 1. it was proprietary, not open source, and 2. I could not get a decent plugin for my Hauppauge remote, not all the functions worked.

Then along comes Evenghost.  Eventghost is an open source application, free to use and supported by a decent group of developers. Since it is open source there are no limitations to creating plugins for it. Looking through the EventThost plugin directory, I was able to find input plugins for both my remotes, as well as output plugins for Media Portal, Sagetv, PowerDVD etc. I had thought about writing a plugin for Beyondtv, however since I did everything in Girder using keyboard shortcuts, I decided to stick with that. This is my step by step instructions on getting Eventghost to work with my HTPC. Other remotes could be substituted as well as other programs.

First off, you will need to download one of the nightly builds to get full Hauppauge support. I started with build 3.6.1487, there is a more recent one I haven't tested yet. Get the EventGhost builds here . You will also need the drivers for your remotes. I installed the ATI remote-wonder-2-5-0-0-english.exe program normally (having it launch on startup) and the Hauppauge ir32_257_26021.exe program, but disabled the automatic launch in the startup folder. (don't need it) Then I installed Eventghost. Now, Girder had a feature to have it launch minimized, I did not see this in the Eventghost options, so instead I made a shortcut to launch it in my Startup folder, and told the shortcut to launch the program minimized.

Now comes to the fun part, customizing Eventghost. First thing is to add the plugins for the remotes.

Adding Plugins to EventGhost

In the right pane, under Configuration Tree, right click Autostart, and select add plugin. Here choose the remote plugins you will use (I added The Hauppauge, generic X10 for the ATI is there by default). Next step is to add all the commands you are going to use. There are sample commands further down in the right pane under Content Folder. Since I am doing keyboard emulation I selected that folder. Under there are various Macros such as Up Down, Play etc.

Adding commands and Macros to EventGhost


You can add additional Macros by right clicking the Keyboard Emulation folder and selecting Add Macro. You can also copy and paste macros, which will give you all events and actions under the macro. Likewise, you can add events (commands from remotes, etc) or actions by right clicking the macro

Adding Macros to EventGhost

To make things simplest, I copied one macro over and over and then renamed the macros to get my full list of commands. The following table lists all the commands I send to both Media Portal and Beyond TV. These are default settings for Beyondtv, however in Media Portal I changed several of the shortcuts to be consistent with Beyondtv. To do this, you need to edit the Keymap.xml file in the TeamMediaPortal folder. Alternatively, you can assign specific commands for each program (to do this you will need to read the short manual – http://www.eventghost.org/wiki/Short_Manual) but I like to keep things simple.

Keyboard Shortcut Beyondtv Media Portal
P Play Play
S Stop Stop
space Pause Pause
' (apostrophe)   Fast forward
; (semicolon)   Rewind
. (period) Skip Forward Next
, (comma) Skip Backward Previous
Up Up Up/Big Jump Forward
Down Down Down/Big Jump Backward
Left Left Skip Backward
Right Right Skip Forward
Enter Enter Enter
Home Menu Parent Directory
Esc Back, Exit Back
O Options Menu Toggle Playlist/Menu
R Record Add/Remove Playlist
Alt-F4 Shut Down BTV  Shut Down MP
] (end bracket) Channel Up Page Up
[ (open bracket) Channel Down Page Down
#NAME? Volume Up Volume Up
#NAME? Volume Down Volume Down
Alt-Tab Switch Between Programs  
F Fullscreen Visualizations  
Start Program Btvd3dshell.exe Mediaportal.exe

More keyboard shortcuts can be found here:


I name the macros with both the general function and the keyboard function, So Play->P is Play, shortcut P. Under the macro I create either an Emulate Keyboard or Start Application action

Then I edit the action as needed, either entering the shortcut or the path the the program to launch.

Last step is to add the events to each macro. The easiest way to do this is to just press a botton on the remote you want to assign to the macro. The event appears in the left pane when you press it. You can then drag this event to the macro you want to assign it to. For most commands, I have two events, one for each remote (some of the ATI commands don't need eventghost, such as the button keys, etc).

Now, I don't use my Hauppauge remote itself, instead I use a universal learning remote that's programmed for my entire home theater. The Hauppauge remote keys are available as one of the Toshiba VCRs (trial and error to find one that works the best). I use a Universal RF10, so I just learned the keys so I could put them wherever I wanted. With the Hauppauge, since the remote program is not running in the background (just the dll) you will need to assign all the keys, including the numbers.

And that's about it. Once you've assigned all the macros, events and actions just save the config file and you should be ready to go. Mind you, this is just scratching the surface of what you can do with Eventghost. You can link it with a UsbUIRT to control all your devices, set it up with an X10 or Smarthouse control, have it launch events and respond to events, etc. You can also program different commands based on running applications. Like I said, I like things simple so the keyboard shortcuts works for me. Now I have the option of controlling my HTPC with my home theater universal remote, or using my Remote Wonder as a remote and wireless mouse. I also have some interactive remote control programs that I run through my PDA, but we'll save that for another article.


About the author:  "ZetaVu is a frequent commenter and Guest-Poster at GeekTonic with a great deal of knowledge with HTPC's and other media gadgets.  I've gotten to know him from the many hours spent on the Snapstream, MediaPortal , AVS and other Forums where you'll often find him (under the same online name).  His past guest posts include iPod Without iTunes, Video Editing Power Tools, and MediaGadget Showcase for his setup all of which are great reads.

Friday, May 08, 2009

HD 101 - An Acronyms Primer by EngadgetHD

Ben Drawbaugh posted a nice primer on High Definition Acronyms over at EndgadgetHD.

What is ATSC, PSIP, QAM and 8-VSB?

Prepared to geek out a little with Ben (he's insanely good at this HD technical stuff) and learn a bunch about the basic terminology of HD Technology.  I consider this a highly recommended read if you're interested in High Definition at all.  At least skim it and read up on the terminology you might not know or understand.

Read the article: HD 101: What is ATSC, PSIP, QAM, and 8-VSB? at EngadgetHD

Wednesday, March 11, 2009

KindleTips - Ultimate Kindle 2 Shortcuts and Tricks

You knew I couldn't leave well enough alone.  Over two weeks with the Kindle 2 eBook by Amazon.com, my GeekTonic Kindle 2 Review and my wife's Non-Geek Tonic Kindle 2 review are both complete so what to do?  Well I have actually been reading on the Kindle 2 quiet a bit, but I've also been doing the "geek"-thing and searching for as many keyboard shortcuts, tips, tricks and hacks that I could find.  I even went as far as trying random key-presses to see what I could dig up.  I found a lot of information for the Kindle 2, the sort of things that make this Geek Reader excited. 

So without further talk, here are the best shortcuts, tips, tricks and hacks I could find and confirm for the Kindle 2 - enjoy!

Power, Reset, Sleep and Wake:

  • Sleep/Wake - Slide and release the power button (on top of the K2)
  • Power Off - Slide and hold the power button for 4 seconds
  • Reset - Slide and hold the power button for 15 seconds

General Shortcuts:

  • Screen-shot - Alt+shift+G creates a screen-shot (.gif format) that goes to the Documents Folder of the Kindle 2 which you can view when connected to computer.
  • Refresh Display - ALT+G (if you notice any ghosting, try this shortcut) Also useful for refreshing web browsing page
  • Jump to page 1 - 5 on Home Screen - Press the number on keypad and then press 5-way Controller
  • Display the Time - Press MENU button
  • Display Free Memory - Press MENU button
  • Display Wireless Network (3G or 1X, if wireless is on) - Press MENU button
  • Play Minesweeper - Shift+ALT+M (from home page) (M or enter to mark; R to restart game; 5-way controller to move cursor)
  • Go to Amazon Kindle Store - alt-home
  • Jump to Web - Type in your search terms and move the 5-way controller to the right and then select “google”.
  • Search Wikipedia - Select "wikipedia" in search category
  • Search Content by Specific Author - Enter @author [author’s name] in the Kindle Store search bar
  • Alpha Search - To search for an author or title by first letter, click one letter on the keyboard and press the 5-way controller.  Then go immediately to the place on the list with the first author or title under that letter alphabetically, *but only if that match exists*. So if you have no Q's, you can't get to the R's that way.  This doesn't work for "Most Recent First" listings but seems to work for title or author sort and could be useful if you have a lot of books on your Kindle 2.
  • List Supported Search commands - Type @help in the search string to display other supported search commands like @dict, @url etc.
  • Search Kindle Store by Author - When in Kindle Store, type @author in searchbar to limit your search to author names
  • Show Diagnostic Data - From Settings Menu, enter 411
  • Show Current Radio Diagnostics -  From Settings Menu, enter 411 (constantly refreshes the data)
  • Search Amazon Kindle Store for Free Books - From Kindle Store search, type in -domain into the search field.
  •  


Entering Text - Symbol Shortcuts

  • Double Quotes " - Alt-9
  • Colon : - Alt-8
  • Comma , - Alt-7
  • Question Mark ? - Alt-6
  • Apostrophe ' - Alt-0


Book or Periodical Viewing:

  • Add or remove a bookmark - ALT+B.  Alternate Method: Press 5-way up/down to go to cursor mode, and then press 5-way controller twice.
  • Alt+shift+1-9 - changes the spacing and number of lines per page (default is 3)
  • List Sections of Periodical - Press the 5-way Enter Button
  • Newspaper View Summaries - To view summaries of the articles in a newspaper or magazine, while viewing the newspaper section list, press the 5-way controller to the right to highlight the number showing the number of articles in a section, then press the 5-way select button - This will bring up the list of articles in that section and you can navigate directly to any one you wish.  This little trick makes Newspaper reading much, much better!
  • Jump Quickly through Periodical - Move 5-way controller to right to go to next article or to the left to go to the previous article

Text-To-Speech Shortcuts:

  • Start or stop text-to-speech - Shift+SYM (shift key is the "up arrow")
  • Pause text-to-speech - Spacebar
  • Switch Between Male and Female Voices & Change Voice Speed - Alt + Aa keys & then toggle between settings with the 5 way controller
  • Start text-to-speech at specific point on a page - To begin the text-to-speech at a particular point on a page, move the cursor with your 5-way controller to the point just before you want the reading to begin.

Audio Controls:

  • Play or stop MP3 Audio - ALT+spacebar
  • Skip to the next audio track - ALT+F
  • Pause Audible Audiobook - Spacebar

Photo Viewer Controls:

The picture viewer can be activated by connecting your Kindle2 via USB cable to your PC and create “pictures” folder in Kindle USB disk. Create subfolders inside of that and copy the pictures. The subfolders will then become “book” names and the pictures will be pages. *.gif, *.jpg and *.png files all seem to work. Now you disconnect the USB cable and press Alt-Z in the home screen.  Your picture folders should now appear among the books now.

While you are viewing pictures in the Picture Viewer:

  • Toggle Actual Size - C
  • Toggle Full Screen - F (currently not working properly)
  • Zoom In  - Q
  • Zoom Out - W
  • Rotate - R
  • Reset Zoom Level - E
  • Pan Photo Larger Than Screen - Use 5-way controller to pan photo


Other Tips and Tricks:

  • Save All Words You've Looked-up in Dictionary - When you look a book up in the dictionary, highlight the word & the definition and it will save it to "My Clippings."   You can then track all of the words you've looked up.  My Clippings is accessible in a text file when your Kindle is tethered to your computer with the USB cable.  Here's a step-by-step guide on saving your looked-up words:
    • 1. Place the cursor over the word you want to look up. (or search for the word)
      2. A "mini definition" displays at the bottom of the screen.
      3. While the mini-definition is showing, press the "return" key.
      4. The more detailed definition from the dictionary will appear.
      5. Place your cursor at the beginning of the entry and click the 5-way controller.  Then move the cursor to the far-right point of what you want to save to "my clippings" and click the 5-way controller once more to highlight the definition.

  • Turn multiple pages at once - Hold down the next/prev page button or click them multiple times causes the Kindle 2 to turn several pages at once.  It's slow and not ideal, but does work.
  • Make your own custom screen-saver images - For those more technically inclined read this how-to on the mobileread forums
  • Delete Book from Kindle - Highlight the item you want to delete (navigate with 5-way button), then press left with the 5-way controller to bring up the Delete selection option.  Press select with 5-way controller to confirm deletion.

Kindle at the Bathtub

  • Read Kindle 2 Around Water - Use a Ziplock Bag to protect your Kindle 2 during bathtub reading - this is one my wife tried out (successfully) during her review of the Kindle 2.  Still, don't drop the darn thing in the water - it's just too expensive for that.


These tips and tricks were compiled from my experiences as well as the following locations:

Whew, that took a long time to try all of these out.  If I missed any shortcuts or tricks for the Kindle 2 you know of let me know in the comments.

More GeekTonic Coverage of the Kindle 2 eBook Reader:

GeekTonic Kindle 2 Review

Non-Geek Tonic Kindle 2 review from the recreational readers perspective

Kindle 2 Photos, Unboxing Video and 1st Impressions

Kindle 2 Text-To-Speech in Action - Video

Thursday, February 12, 2009

Video Editing Power Tools

This is a guest post by ZetaVu

Video Editing Power Tools
I have been an avid user of Snapstream’s Beyondtv for years now. I like it because it takes care of my guide information, is very user friendly, works with all my tuners (hardware mpg encoders, over the air HD, and the Hauppauge HD PVR), and has a lot of great features. It generates smartchapters to identify commercials (some people prefer Commercial Cutter, both have similar success rates in my testing) and has a built-in showsqueeze feature to convert videos to divx, wma, or ipod H.264. I’ve also used or tried SageTV, Media Portal, Mythtv and several other PVR programs, and each have positives and negatives. However, none of these programs will do all the video editing and conversion I need to do so I've put together this discussion on some of the other editing programs I've use or have tested out.

NOTE:  THIS ARTICLE WAS UPDATED ON 2/13/2009 TO ADD THE HANDBRAKE TOOL

Now I have a few different types of video files to work with. Beyondtv records either mpg2 files, mpg transport streams (.tp files) or H.264 transport streams from the HD PVR.  In addition, I capture DV (avi) files from my camcorder and convert those to mpg2 files for making dvds. I also showsqueeze files to Divx or ipod H.264 using Beyondtv (for archiving or loading on my ipod) and make Xvid files with Autogk for archiving. (I go back and forth between Divx and Xvid, depending on what I do with that file). That in mind, I look at other software to edit and link files together (mostly removing commercials) convert formats, repair issues with recordings, and in the case of my home movies; capture, edit, transitions and titles. The bulk of these applications are freeware or open source, but I’ve listed some pay applications that I use as well. I think 90% of what I do can be done with freeware, and almost all can also be done on Linux as well as Windows (one of my goals is to eventually migrate everything to Ubuntu).

TO CONTINUE READING THIS ARTICLE, CLICK THE LINK BELOW


Converters


Here I want to focus strictly on format converters. I won’t go into too much detail on Snapstream’s Showsqueeze, even though that is my top converter. As a result I really don’t look into many Divx converters.
Auto Gordian Knot
AutoGK
My main conversion program is Autogk  which does both Divx and Xvid, but I use it mainly for Xvid conversion.  I’ve had a few issues with the latest version, as a result I stay with version 2.27.  Autogk is actually a collection of programs and a front-end that simplifies the whole process. It lets you input mpeg2, TP, VOB or even INF files from dvds for conversion.  You can convert based on quality, percentage reduction, or a specific file size. Depending on the amount of compression Autogk can keep 5.1 audio intact or convert to mp3. Speed wise it is similar to Snapstream’s showsqueeze, and depending on compression files look good on my 46” LCD. I archive standard definition shows to about 350mb/45min (1 hour show without commercials) and HD shows to about twice that.

Handbrake

Handbrake

I accidentally omitted Handbrake  from the original
draft, not by ignorance, just rushing the article out without checking
my notes. As many users pointed out, this powerful tool will let you
convert almost any format, accepts mpegs, transport streams, H.264 files
(yes, those HD PVR monsters that seem to befuddle other converters) etc
and convert them to a variety of formats (H.264, xvid, ffmpeg, did not
see divx). You can choose audio (my test files would let me choose mp3
or ac3), choose compression (size or bitrate) constant, variable, 2pass,
etc. You can crop your frame and on some files resize. It works with DVD
files, allows you to insert chapter points, etc. Like one commenter
posted, its what Autogk would have been had development not been stopped.
I’ve tested this with H.264 files from my HD PVR and it was able to
convert them to Xvid in about the same time BeyondTV was able to
showsqueeze them to Divx. Quality was comparable so as a result I use
the BeyondTV showsqueeze mainly for convenience (I expect a handbrake
plugin to be in the works as well). I can forsee eventually replacing my
Autogk installation with Handbrake. The fact that it is also
multiplatform (Windows Linux Mac) will pretty much put an end to my
searching for the ideal converter for Linux as well.


PocketDivxEncoder

Another handy converter is Pocketdivxencoder I use this to make quick conversion of videos for my PDA, and it is designed to work well with TCPMP (the Core pocket media player http://www.hpcfactor.com/downloads/tcpmp/) I use this because it is fast and lets you setup multiple jobs at a time.
ABC 3gp Converter

My last portable converter is ABC 3gp converter Install-ABC-3GP-MP4-Converter.html. I use this for the rare times I want to convert video to play on my cell phone (which only supports 3gp, it’s getting dropped hard soon). I’m sure there are other and better programs out there, but this was free and it worked. I expect with newer phones won’t be so limited so this app won’t be needed as much.
HDTV to MPeg2

Another App I used to use is HDTV to mpeg2 .
HGTVtoMpeg2
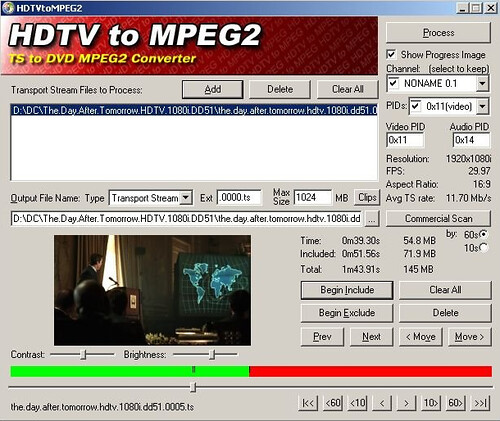
I used to use this program until Videoredo started supporting transport streams. This lets you convert a any of the subchannels of a transport stream to mpeg2 files.
Other Convert Applications

I have a few other converter applications in my arsenal, most of which have been replaced by Avidemux. I also tried a few FLV converters, but now I just use the Firefox plugin Downloadhelper (even that has some issues). For the most part I just play those files in Vlc. I also looked at a few WMV editing and conversion programs, Apex video converter and ASFtools stand out in memory but I cannot recall if that is good or bad. Either way, most of these functions are obsolete because of the programs in the next section.

Note, all of these are primarily Windows converters, I have a lot of catching up with Linux converters, and fortunately the editors below handle most of this.

Editors - Editor/Converter/stream repair

VideoReDo
VideoReDo
First off I have to list Videoredo. For the most part editors here are freeware or open source, but Videoredo has served me so well over the years it deserves not only mention but to serve as a benchmark for other editors. Videoredo does very fast rendering, faster than any other program I had seen until then (Avidemux is faster now). It lets you cut or trim videos, recognizes projects based on Snapstream Smartchapters or Commercial Cutter, lets you join files together, and most importantly will run quickstream fixes that can identify dropped frames, repair files, correct audio sync issues, etc. It is limited to mpg files and transport streams, does not work with Divx, Xvid, or H.264 files at this time. It is also not freeware, but you can get a 30 day trial.
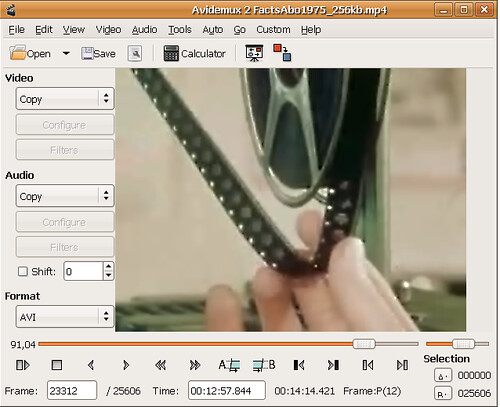
AVIDemux

Avidemux  (alt site)  is now my new favorite editor.  First off, it is multiformat, available in Windows, Linux or Mac. Secondly, it handles most formats. I’ve been able to edit everything except a few H.264 formats (but those should get upgraded soon). Third, it is fast (for rendering anyway, opening files sometimes requires rebuilding). It does not however recognize Smartchapter or cutter projects, and does not seem to have quickstream fixes like Videoredo (however I’m still learning what I can do with it)
AviDemux

Opening files is slow as it may need to rebuild data. Xvid files need you to rebuild frames (say 90 seconds for a 90 minute file) but then saving changes takes less than 10 seconds. Divx require unpacking which is about the same time. Mpg-2 and transport streams need indexing to open which is much faster.

Like Videoredo, Avidemux lets you set start and end points and either cut out the section or trim to that section. Combining files together is much simpler using the append command, however video shape needs to be the same (which is easily done with in Avidemux as well). I mostly use this to remove commercials in Divx files I make from my HD PVR recordings. While there are H.264 editors available, I am happy using Beyondtv’s Showsqueeze feature to archive my file, then use Avidemux to remove commercials from that Divx file. It’s also great for joining fragmented files together, converting between formats and properties, and is almost up to the Movie Maker Editor. For a free editor, this is by far the best, and better than almost all pay editors.

All in all, while I still use Videoredo to remove commercials from mpg or tp files, and as a quickstream fix when needed, I forsee a day when I replace it completely with Avidemux and mpeg2repair.
MPEG2Repair

Speaking of which, I have become a quick fan of Mpeg2repair.  This was pointed out to me by one of the Snapstream devs when I was having issues with HD recordings over the air.  Even though I was seeing high signal levels, my capture cards were getting errors causing me to see frozen video for a few seconds. Mpeg2repair is limited as it is used to scan and repair these transport streams. The benefit, running a transport stream (HDTV) recording though this utility will identify, log and repair errors. So instead of frozen video you get minimal pixilation at each error point. One of my tuners has poor reception on some channels, so if that tuner is needed for those channels, I fix the recording with Mpeg2repair before watching it (takes about 10 minutes for a 1 hr recording).
TMPGenc

Tmpgenc used to be a favorite of mine. I used it when converting or building DVD’s, and it was especially useful for splitting or combining audio and video in mpg files. It is limited to that format (hence the name). However new DVD ripping and burning software really has made a lot of these functions obsolete, and I don’t even keep a copy of this on my computers anymore. Plus, I’m not sure if the free version is as functional as before or if it is time limited.
H264TSCutter
h264 TS Cutter

H264tscutter  is the first freeware app I found to cut and edit H.264 files from the HD PVR. This lets me edit down the HD PVR files. Its a lot clunkier than Videoredo, for example the skip frames are 3 seconds (100 frames) at the most, otherwise you need the slider to navigate. It is also less stable and can lock if you click too many times at once. You can enter time in manually in seconds, which if you know the times of commercial breaks will help a lot. Also, it only works with the .ts extension files, if you record as .tp files you need to change to .ts to edit (then set start to iframes, etc, you'll get a warning when you open) I prefer converting my files to divx and then edit in Avidemux, but this will work with H.264 files, just a lot more effort

Note, if you enter values in the timeline, say 72 for 1 min 12 seconds, you will have to let the software correct for slight decimal values. Use one of the next/prev buttons (I use the 5 frame button) so it can sync itself correctly, some value like 72.1435. Otherwise when you try and cut your project you get an exception. I have not seen a newer version yet but I hope they correct this soon.


Movie Maker/Editor/Converters


This section is for what I consider the movie making application a.k.a. home movies. These programs are a little more intensive than just editors, apply effects, animation, filters etc, and their main purpose in my opinion is to capture firewire DV from you video camera, edit and make home videos.
Kino, Jahshaka and Cinelerra

In Linux you can get Kino which is the best I’ve tested so far (and I have a lot of catching up to do) but I’ve also heard Jahshaka  and Cinelerra show promise. There are others that I have not had a chance to look at, and all are showing more promise. Kino looked like the best at the time of this article, allowing firewire capture editing, adding audio, effects, transitions, most of the same features of the pay Windows programs.

Vivia & Ulead VideoStudio
For Windows, the only freeware application I’ve looked at is Vivia  mostly because it available for Windows and Linux. I currently have Ulead Videostudio which I use routinely so I haven’t delved much in Windows freeware for Movie Making. As of the writing of this article Vivia only supported PAL, NTSC will be available in version 0.2, so I won’t do any more testing until then. I thought they were worth a mention since they were multiplatform and open source, and slowly building transitions, effects, and other features.

As I’ve stated, I personally use Ulead (now Corel) Videostudio. The reason? I’m just comfortable with it. It is pay software, much like the industry standard Adobe Premiere. As such, I won’t go into too much detail about these two products. My main use for them is to capture video from my camcorder, edit, apply effects as needed (contrast, color adjustment mostly), add transitions, titles, and make mpg files for my library and for DVDs. What I like about Videostudio is that I can make several small mpg files or scenes, and then when I’m ready to build a DVD I can combine them together in a project, and build a DVD with a single VOB series, and each clip will automatically have a chapter associated with it. Most DVD authoring programs make separate VOB’s for each movie clip, or if you combine the clips into a large file it won’t preserve the chapter points. The negative is that Videostudio takes a long time to render the movies, sometimes several hours to make a 2 hour DVD. However, I’ve tried a lot of program combinations (Tmpgenc, Videoredo, DVD Moviefactory etc) and in the end this has been the best for me.

Notable Mention
Here are a few utilities that I think are worth mentioning.
  • DSFMgr -  Direct show filter manager – useful to check your installed filters and add/remove or change priority of them.
  • Gspot codec appliance  great for checking files and getting info on compression and format.
  • Videoinspector is another popular choice for checking files and getting info on compression and format.
  • Media Info another application which gives details on files, this one works well with transport streams.

Useful Media Players

I typically like to keep VLC and Zoom player available, VLC ideally for streaming and Zoom makes it easy to choose filters and decoders.

Many thanks to ZetaVu for sharing his experience with video editing tools.  This was the third in the series of many guest posts on GeekTonic.  Those of you who read ZetaVu's first guest post understand that ZetaVu knows his stuff and is a frequent commenter at GeekTonic with a great deal of knowledge with HTPC's and other media gadgets.  I've gotten to know him from the many hours spent on the Snapstream, MediaPortal , AVS and other Forums where you'll often find him (under the same online name).
[/span]

Saturday, December 06, 2008

SageTV Tip: FanArt Custom Media Backgrounds

Yesterday, SageMC 6.3.8a was released with support for FanArt giving you custom background images for each media file.  This article will provide an overview of the new FanArt feature in SageMC and provide a how-to on setting up FanArt in SageMC as well as finding fanart for your collections.

Custom FanArt background displaying while browsing Recorded "Fringe" TV Episodes


Before I go further into this tutorial, I want to send a speical thank-you to Mike known as MeInMaui on the SageTV forums for all of the work on this latest SageMC release including the new FanArt support.  His tireless work on the latest SageMC updates has really kept SageMC updated to be the arguably the best Add-On for SageTV available today.

What is FanArt?
Basically fanart typically refers to artwork by fans of a certain media such as movies, television shows or music.
 What does FanArt mean for SageMC users?
When you enable FanArt in SageMC, you enable custom backgrounds for each media file.  In other words, as you browse your Aerosmith album, your TV episodes of Fringe or even the Dark Knight Movie, your background will change to match that media.  Several other HTPC programs (only on select themes) already have support for FanArt including XBMC, Meedio and Media Portal among others

Example of FanArt in SageMC:

This is the details screen for the "Aeon Flux" Movie.  In SageMC, this is what you see by default - the normal background with details, a small cover image and the inteface controls to play etc.

SAGEMC WITHOUT FANART ENABLED


This screen-shot is from the same details screen as above, again for the "Aeon Flux" Movie except this time FanArt is enabled and the custom "Aeon Flux" FanArt background is displayed instead of the standard background.  Some will prefer the standard background, but the effect is striking to me and something I've switched over to on my setup.  I ran it by my wife for her opinion and she liked the custom backgrounds as well.

SAGEMC WITH FANART ENABLED


FanArt in SageMC Tutorial
So now that you know how cool FanArt can make your SageMC setup, how do you get started?  Well the process isn't as automated as we'd like (yet), but it isn't that difficult either.  Follow these steps to get your custom media backgrounds:
  1. First you'll need the SageTV HTPC software and then install the latest version SageMC 6.3.8a or higher.  If you're new to SageMC (not the same thing as SageTV - I know it's confusing), read the GeekTonic SageMC Primer here.
  2. Next you need to enable the FanArt function in your SageMC Settings.  In SageMC, browse to Settings>SageMC>Main>GlobalUI Options>Display>  Set this as "enabled" like the screen-shot below.  This can be switched on and off as desired.


  3. Now it's time to set up your FanArt directory.   You have the option of putting all of your fanart in a single directory, all in a set of subdirectories within a single directory or each individual fanart background locally with each media file.  My recommendation is to use a single FanArt directory and then set up a subdirectory for Movies, Music and TV.  To go this Central FanArt Directory Method here are the steps:
    1. Create a special directory just for your FanArt.  I selected Media/FanArt and then created three subdirectories: Media/FanArt/Music,  Media/FanArt/TV, Media/FanArt/Movies. 
    2. Next you'll need to tell SageMC where that main, FanArt directory is - don't worry, SageMC will find your TV, Music and Movies subdirectories automatically.  To do that browse to Settings>SageMC>Paths>Media Bkgrnd File Path.  Here you need to enter or browse to the location where you'll be saving all of your fanart - in my case Media>Fanart
    3. Rename all image files to match the name of your media file exactly.  For television shows, it should match the TV show name (like Fringe.jpg for Fringe), for Music it should match the artists name (like Aerosmith.jpg for Aerosmith), and finally for Movies it should match the movie title (like DarkKnight.jpg for a movie you've named DarkKnight).   [NOTE:  If you have any media files with the following characters in the name: ( \ / : * ? " < > | ) leave out these characters when naming your FanArt background files.]
    4. If you're using this Central FanArt Directory Method described in this step 3, skip to step 5 now.
  4. If instead of the Central FanArt Directory Method described in step 3 above you want to place your backgrounds locally with the individual media files follow these steps:
    1. Movies - Rename your Movie FanArt background image to be "background.jpg" and place it in the same location where the media is.  For example if you have a ripped DVD located in DarkKnight/Video_TS/ you'll put your Background in DarkKnight/Video_TS/background.jpg.  For non-DVD format video files rename your video FanArt background image to be VideoFileName_background.jpg
    2. TV shows - Rename the background in the shows directory as VideoFilename_background.jpg
    3. Music Rename the FanArt background image file as  background.jpg in parent folder OR [Album Name].jpg in central folder OR [Album Artist].jpg in central folder OR [Artist].jpg in central folder.
  5. Now it is time to find your FanArt to use with your SageMC setup.  For now importing the FanArt images isn't an automated process (although I think that is in the works for a future update).  But it isn't that difficult to find what you're looking for.  I'll cover this in the next section below.

    Finding FanArt Images on the Web

    I've been adding FanArt to my setup for a while now and have found several nice sources for some stunning FanArt images you'll want to grab.  Check out these locations for the best FanArt:
    If you know of other locations for FanArt, let everyone know in the comments.

    Custom FanArt background displaying while browsing "All-American Rejects" Music


    Want to learn more about the many add-ons and inner workings of SageTV?  Check out the GeekTonic Ultimate Guide to SageTV which is updated continually.

    Friday, November 21, 2008

    SageTV Ultimate Guide


    Looking for a one-stop place to find anything and everything there is to know about the popular SageTV HTPC software?  Tips, tricks, reviews and more?  GeekTonic continues to be the go-to place to read about SageTV HTPC software, but over the past few years the posts about SageTV have become a bit scattered.  So to wrap all of these SageTV resources into one page I've created this SageTV Landing Page for you.
    This page contains everything on GeekTonic about SageTV to-date and I'll continue to keep it updated as I add additional SageTV stories so bookmark this page and check back when you're looking for that SageTV article.
    NOTE:  SageTV has updated to SageTV 7.  While I update this guide, many of the stories linked here are related to the older version - SageTV 6  The most recent, SageTV 7 articles are as follows

    MOST POPULAR SAGETV RESOURCES AT GEEKTONIC:


    OFFICIAL SAGETV RESOURCES:


    • SageTV User Guide - This just might be the most comprehensive resource for SageTV users available.  Lots of information all kept up-to-date with each new release.  It's a very long read, but useful for looking up information about SageTV.  And if you have SageTV installed on your PC, it's already there in your SageTV directory.
    • Request Official SageTV Support - Often times a SageTV user will go to the forums and report an issue they are experiencing.  Most of the time the solution for that issue is answered by fellow SageTV users, but sometimes you need official support from the SageTV guys themselves.  Use this link for this.  Its important to note that not all of your forum posts are seen by SageTV reps so if you want a broken feature fixed - this is the way to report the issue.
    • General SageTV Troubleshooting - A list of commonly asked troubleshooting issues and the solutions for those issues can be found here
    • SageTV Forums - one of the most active HTPC forums on the net is the SageTV forums.  Here you'll find the most knowledgable and helpful peers on the net.  Ask for help or suggestions, read up on tips from fellow users, see the latest add-ons and themes for SageTV all on the SageTV forums
    • SageTV Customizations List - Want to see a comprehensive list of the SageTV add-ons, themes and other customizations available to you?  This is the master list which is kept up-to-date regularly.  There are so many ways to make SageTV your own - this is a great place to just review all there is for you as a SageTV user.


    SAGETV TUTORIALS


    REVIEWS


    SAGETV NEWS


    SAGETV ADD-ON'S


    SAGETV THEME SPOTLIGHT


    MISC. HTPC INFO


    Stay tuned to GeekTonic for more SageTV reporting.
    If you have something you've been wondering about SageTV or anything HTPC you'd like to see covered let me know in the comments.

    Monday, June 23, 2008

    Brain Surgery for Your PC – How To Upgrade Your CPU

    Replacing your computers CPU isn't too difficult, but it can intimidate someone who hasn't done it before.  Replacing the brain of the computer may sound like brain surgery, but it isn't nearly that difficult.  When planning for my new HD-PVR Component Tuner I knew I’d need to upgrade my CPU to get decent playback with the h.264 files output by the HD-PVR so I purchased a new dual-core CPU and chronicled the CPU upgrade to share with everyone.

    Here's the steps I followed to upgrade my HTPC client PC's CPU from a single-core CPU to a dual-core CPU:

     DSC04040DSC03947


    I chose a processor that was compatible with my motherboard so I could simply switch out the new CPU with the old.  If you've maxed out your CPU upgrade options then you'll have a lot more work to do.

    Disconnect the power cord that connects to the CPU fan and the motherboard.

    DSC04057


    DSC04023

    DSC04019

    Remove the heatsink.  The heatsink is basically a piece of metal that handles the heat and has a cooling fan mounted on it.  Check out your latching mechanism on the existing heat sink and release it - usually just takes a thumb to release the latch and then just pull off the heatsink from the processor.  Mine had two latches, but you can just release the one side and the other side releases as well.  Pulling off the heat sink may require a little force if the old thermal compound is dried or stuck to the CPU and heatsink.

    DSC04024

    Release the CPU socket lock.  My CPU and most newer once have sockets where the CPU is locked in with a lever.  To remove my Athlon CPU, I used my index finger to release the latch and then simply removed the CPU from the socket.

    DSC04031

    DSC04025

    Next take your new CPU, gently seat it into the socket matching up the two corners of the socket with the CPU (the socket is "keyed" so that you can only install it the proper direction) so it fits in just right.

    DSC04036

    DSC04045

    Now you need to add thermal compound (I used Artic Silver) or the XXXXXX that came with the CPU.  If you're using thermal compound, put on just enough right in the center using about the equivalent of a small pea or as my CPU instructions said "a large grain of rice or two."

    DSC04055

    Now take the heatsink you pulled from the original CPU and set it properly onto the new CPU.  This will spread the thermal compound over the dye on the CPU to keep it cool.

    Fasten down the the one side of the heatsink latch and then the opposite side.

    Next connect the power cord to the heatsink fan and then the opposite end of the power cord to the CPU connection on the motherboard.

    You’re done.  Start up your PC and make sure everything is working.  If all is well you should have a faster PC able to handle it’s new work.  For me I took a HTPC and made it capable of handling h.264 files output from my yet-to-be received HD-PVR.  Since the HD-PVR has arrived the upgraded HTPC handled h.264 files with flying colors.

    Wednesday, April 02, 2008

    One Click DVD Rip to HTPC

    Want a super-easy way of archiving your DVDs to your hard driver or even to your Home Theater PC?  I'll share with you my method of ripping the movie from the DVD and putting it into a folder for viewing on your HTPC.

    I needed a one-click script that would rip a DVD to my HTPC with the click of a button.  Add to that, I wanted the rip to end up in a single mpg file with just the movie, but including any subtitles and audio tracks - all with no transcoding to maintain quality and still reduce the size a little (size reduction in this script is only achieved by removing the extra features.)

    I started with a script I picked up from a friend on the Snapstream forums pwlong.  With that script I modified it to serve my purposes - no transcoding, a single mpg file and one-click action from the HTPC 10ft interface?  Here's how to set it up:

    1. This script uses a program called DVD Decrypter which isn't updated any longer, but is still available and works with most DVDs.  If you don't already have it you might be able to find it by searching for "dvddecrypter fileforum"                                         11
    2. Download the script zip file from here, and unzip the rip2one.cmd file.
    3. Install the script into your preferred directory on your HTPC.
    4. Open the script with notepad or another editor
    5. Go to the User-defined variables and change the "set dvddrive=" to your dvd drive21
    6. Change your drivespeed to the dvd read speed you prefer.  Slower will be quieter.  Also update the location of your movies by putting the path in "set dvdlibrary="22
    7. Finally, change the logfile location to the location of your choice.  The default is "c:\temp\rip2one.log"
    8. Save the script - I have it named rip2one.cmd but you could rename it if you want to.
    9. We'll eventually add it to our HTPC, but for now its time to try it out.  Put a dvd in your drive and run the rip2one.cmd script.  Once the dvd is extracted to your hard drive the command-line window will close.  Check to see that the movie was placed in a folder by the movies name and that the folder now has a single mpg file ready to be played.

    Now that you know the script is working, you can either create a shortcut for it and just run it as a quick-and-dirty, standalone way of backing up your DVD's or you could integrate the script into your favorite HTPC program.  I'll show you how to do this in SageTV, but you could easily add this script as an external program to most HTPC software programs or even use it as a standalone.  For a simple script to

    use with Snapstream's Beyond Media check out pwlong's how-to


    SAGETV DVD EXTRACT SETUP

    1. You either need to have SageMC installed or Nielms Dynamic Menu Plugin.  SageMC has that plugin built-in.
    2. Right-click with your mouse or press the escape key on your keyboard to open up the Dynamic Menu Options menu.  Select Main Menu Options   1
    3. Select New External Program from the menu2
    4. Type in the path to your command line script "rip2one.cmd" or whatever you renamed it to7
    5. On the next window where it asks for you to insert arguments, just press "ok"4
    6. On the next window, select "do nothing"5
    7. Now type in the name you want used for the plugin - this is what you'll see on the menu item - I named mine "Extract DVD"                                   6
    8. Now Save your menu file.                                         8
    9. You now have your SageTV DVD Extracting Plugin.23

    Note:  When you run the script it will do the following:

    • DVD Decrypter will pop up and begin working
    • A command line window will pop up and provide some info about the processes running
    • Once the rip is complete these two windows will close again.

    Because of the way this happens, focus is taken from the HTPC app when the two windows first open so you'll have to regain focus with your remote.  I have ways of avoiding this, but since this particular script needs to do cleanup after dvddecrypter is complete, I couldn't run it minimized.  If anyone has a solution for this let me know.

    My plans (hopes) for this script is to have SageTV pause to show me the DVD label on the screen and give me the chance to modify the name or select okay to use the DVD label to use as the resulting filename.  I would imagine this is possible, but my programming skills are slim to none.  Instead, I'm just learning Sage Studio and maybe some day I'll get there :)

    Disclaimer:  This tutorial (and script) is being shown for instructional purposes only.  Use at your own risk.  Only use this to back up your personal movie collection of DVDs you own.